Inserting Profinet Devices in the 'Device List' (Station Editor)
This topic assumes that the PLANT already contains a controller with an integrated Profinet controller. To get a controller device into the PLANT, either use a suitable project template when creating the project, or scan the connected network, or drag a controller device from the COMPONENTS area.
If a controller with Profinet controller is available in the PLANT, the following applies:
Double-clicking the 'Profinet' node opens the corresponding editors in the editors area including the 'Device List' editor. This tabular station editor contains all devices which have been scanned or added under the 'Profinet' node. The number of lines (i.e., connectable devices) in the table depends on the controller type.
For documentation purposes, you can enter the 'Function' and/or 'Location' of each device. The 'Function' text is shown in the device node name (preceding the type) in the PLANT. If no 'Function' is specified, the 'Location' text is visible in the tree.
You can add Profinet devices in the 'Device List' as follows:
| Note
Automatic assignment of IP address The 'IP Range' set for the project influences the insertion of a new controller or device: double-click the 'Project' node and open the 'Settings' editor. A newly inserted controller or Profinet bus device automatically obtains the next free IP address of the project 'IP range' set in the 'IP subnet' category. Therefore, specify the desired IP range according to your requirements prior to inserting devices. Refer to the topic "Configuring the IP Settings of the Project". |
- In the 'Device List' table, left-click into the 'Type' field showing the text 'Select type here' or move the table cursor using the arrow keys to this table field and press <Enter>.The Role Picker appears for selecting devices. It is divided into a tree on the left and devices on the right. The control only provides devices for selection that are suitable for the current PLANT node. As the device selector was opened for the 'Profinet' device, the control only offers Profinet devices for selection.
- Select the folder in the tree on the left and then the device to be inserted on the right by clicking it or pressing the <Enter> key.
- The 'IP Address' of the new device has automatically been assigned on insertion: by default, the device gets the first free address within the IP range
specified
in the project settings ('Project' node | 'Settings' editor | 'Ip subnet' category).
Note
If no IP address is free in the specified IP range and the range is exceeded by inserting a new device, the table line is colored red and no IP address is assigned. In this case, modify the 'IP Range' setting ('Project' node | 'Settings' editor). - If desired, enter the 'Function' and/or 'Location' of the device for documentation purpose (see topic introduction).
If the 'Function' property is set for the device, it is displayed in the PLANT. If 'Function' is empty, 'Location' is shown (if set). - Continue with defining the IP settings of the device.
 Example...
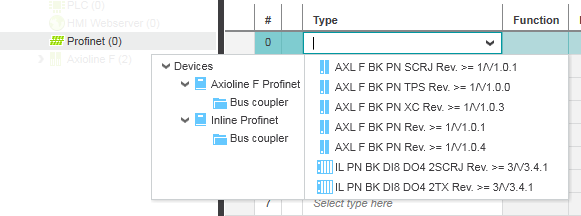
| Further Info
Continue with configuring and parameterizing new devices. |