Adding Dynamics
Dynamics can be added to a single object, an object group or image selected in the HMI page using the properties window. There are different types of dynamics that can be assigned to an object:
- A standard dynamic (hereafter called "dynamic") defines how the position and appearance of an object changes depending on the value of the variable that is assigned to the HMI tag or the evaluation result of an expression. Typical examples for standard dynamic properties are the value of a slider, the rotation of a pointer on a gauge, the length of a bar on a bar graph, etc.
Therefore, dynamics can be used to visualize the automation application in the HMI.Note
You can use expressions to define the condition for animating an object. An expression is a combination of operands and operators (+ * -) that returns a single value after its evaluation. For details on expressions, see the topic "Using Expressions for Object Animation". - An action dynamic (hereafter called "action") defines the operation to be performed when the object is selected or activated by clicking it with the mouse. By linking, for example, an action to an HMI tag, the variable assigned to the HMI tag can be written on selection or on activation of the object. Actions can be writing the value of a variable with a slider, navigating to another HMI page when pressing a button, etc.
Therefore, actions can be used to operate the automation application via the HMI.
| Note
Regarding their use in HMI pages, the following applies to variables of the Safety PLC:
|
 | In the properties window, the dynamics and actions are defined on the 'Dynamics' tab. Clicking the 'New Dynamic' button at the top of the tab shows the list of dynamic and action types that can be added to the selected object.There can be several dynamics and actions of different types assigned to one HMI object. However, there is only one dynamic or action of the same type allowed for an object. |
| Further Info
For a detailed description of the available dynamics and their characteristics, see the topic "Dynamics Reference". |
To add a dynamic or an action to the property of a single object, an object group or image, proceed as follows:
- Select a single object in the HMI page.
- Click the 'Dynamics' tab in the properties window.
If the properties window is not visible, right-click the object and select 'Show/Hide Settings' from the context menu or click the in-place button.
 - On the 'Dynamics' tab, click the 'New Dynamic' button at the top of the tab and select the desired dynamic or action from the selection list.
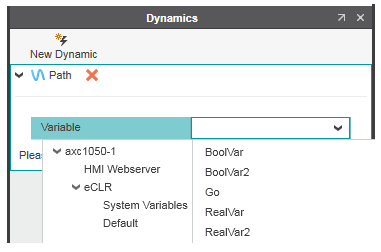
(The list provides only dynamics/actions for selection that are allowed for the object and that are not already added). - For a standard dynamic, select the HMI tag to be linked with the dynamic by clicking the input field right of the 'Variable' field and selecting the HMI tag as follows or define an expression:
- To select an existing HMI tag (assigned to a global IEC variable or a local variable with set HMI attribute), select the group containing the HMI tag on the left and then the HMI tag on the
right by clicking it or pressing <Enter>. (The 'Context' group contains the HMI tags created for local variables and the 'HMI Webserver' group the HMI tags assigned to global IEC variables. Under the 'IEC 61131-3' node, the system variables and default variables are available for which a new HMI tag can be created, see below.)
The selection list on the right provides only those HMI tags for selection that match the data type required by the dynamic/action.Alternatively, type the name of the HMI tag into the input field.In case of an expression, enter the desired combination of operands and operators into the input field.Note
Local variables with set HMI attribute are only relevant for PLCnext Technology controllers. With set HMI attribute for local variables in function block and program POUs, all instances of the POUs expose the local variable as HMI tag. - To create a new HMI tag with automatic assignment to a global IEC variable, select the desired entry under the 'IEC 61131-3' node in the tree on the left and then the variable on the right by double-clicking it or pressing <Enter>.The selection list on the right provides only those global IEC variables to which no HMI tag is currently assigned and that match the data type required by the dynamic/action.Alternatively, type the name of the variable into the input field. The 'Data List' of the HMI Webserver is automatically updated with the new data when confirming an entry.
Note
HMI tags assigned to global IEC variables can be declared as read-only. If declared as read-only, an HMI tag may only be read and not written in the HMI page when running the HMI application. To declare an HMI tag assigned to a global IEC variable as read-only, open the 'HMI Webserver | Data List' editor via the PLANT and activate the 'Read Only' checkbox for the corresponding HMI tag (if the 'Read Only' column is not visible in the 'Data List', click the arrow right icon on the right in the 'HMI Tag' column header). - To select an existing HMI tag (assigned to a global IEC variable or a local variable with set HMI attribute), select the group containing the HMI tag on the left and then the HMI tag on the
right by clicking it or pressing <Enter>. (The 'Context' group contains the HMI tags created for local variables and the 'HMI Webserver' group the HMI tags assigned to global IEC variables. Under the 'IEC 61131-3' node, the system variables and default variables are available for which a new HMI tag can be created, see below.)
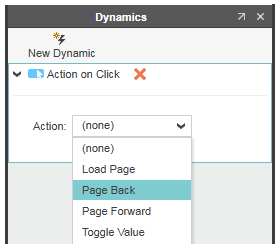
- For an action dynamic, select the desired action from the 'Action' drop-down list. Depending on the selected action type, assign an HMI tag as described in the previous step or select an HMI page to be loaded on activation of the selected HMI object.
- Define the remaining dynamic and action specific properties.
Note
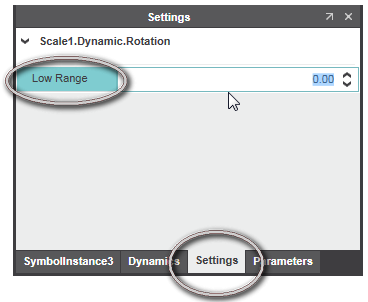
A standard dynamic can be disabled by deactivating the 'Enabled' checkbox of the dynamic. If deactivated, the dynamic has no effect in the HMI application. Disabling a dynamic may be useful for testing and debugging. - Optional: Publishing object/dynamic properties as HMI symbol settingsCertain object/dynamic properties can be published as editable HMI symbol settings. Editable means, the properties are provided as additional properties for an HMI symbol instance used in an HMI page. The published symbol settings are edited on the 'Settings' tab in the properties window of the corresponding HMI symbol instance.
To define a property as published, right-click the property and select 'Add property as Symbol Setting' from the context menu (the command is only available if supported by the property). The value set for the property of the HMI symbol is used as default value for the HMI symbol instance property.
To disable a published property, right-click the property and select 'Remove property as Symbol Setting' from the context menuProperty to be published Property published (provided as symbol setting for HMI symbol instance) 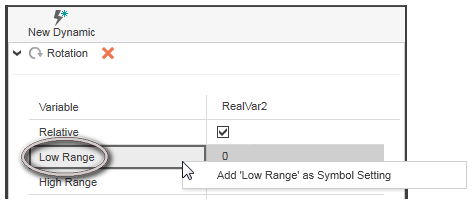
Further Info
For further details, see also the topic "Working with User-defined HMI Symbols".
To delete a dynamic of an object, click the  icon right of the dynamic/action group in the properties window.