HMI Editor
The HMI editor is used to design HMI pages and to configure user-defined HMI symbols. The graphic editor allows you to easily insert HMI objects or predefined HMI symbols into the HMI page, arrange and edit them in the page and set their properties.
To open an HMI page in the HMI editor, double-click the page under the 'HMI Webserver' node in the PLANT.
To open an HMI symbol in the HMI editor, double-click the symbol in the 'HMI' group under the 'Local > Symbols' or 'Default > Symbols' folder in the COMPONENTS area.
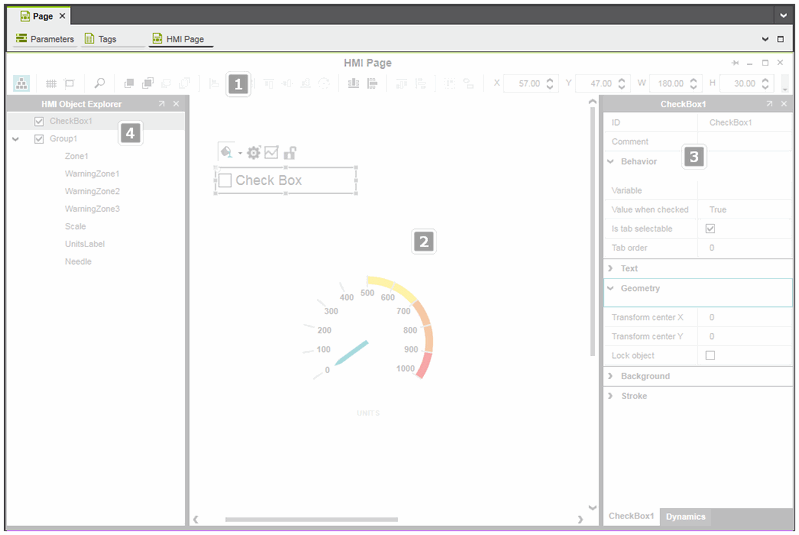
The HMI editor consists of the following components:
| (1) | ToolbarThe toolbar contains buttons that are used to toggle the visibility of the grid, to activate/deactivate the snap-to-grid function, and edit HMI objects/symbols, such as aligning, grouping objects or changing the display order of the objects. The horizontal and vertical position of a selected object, its width and height in pixels and the rotation in degrees can be edited in the input boxes on the right in the toolbar.Each toolbar button provides a tooltip that shows a short description of the command. |
| (2) | Drawing areaIn the drawing area, you can insert objects from the COMPONENTS area, move or resize them, bring them to the front or back, group them, etc.Depending on the object(s) selected in the drawing area, the context menu provides a subset of commands that are applicable to the selection.If the mouse cursor is within the drawing area, the status bar indicates the current X and Y position of the mouse cursor relative to the upper left corner of the area. |
| (3) | Properties windowObject-specific properties as well as HMI page properties and HMI symbol parameters are set in the properties window. Here you define static properties of the objects, add dynamics to an object, etc. Depending on the object selected in the HMI page, the properties window may contain several property tabs. Which tabs are actually available depends on the selected object.By clicking the 'Undock' icon  in the window title bar, the window can be undocked from the user interface and placed anywhere on the screen. To insert it at its original position, click the 'Dock' icon in the window title bar, the window can be undocked from the user interface and placed anywhere on the screen. To insert it at its original position, click the 'Dock' icon  .You can show or hide the properties window by right-clicking in the drawing area and selecting 'Show/Hide Settings' from the context menu or by double-clicking anywhere in the page. .You can show or hide the properties window by right-clicking in the drawing area and selecting 'Show/Hide Settings' from the context menu or by double-clicking anywhere in the page. |
| (4) | HMI Object ExplorerThe HMI Object Explorer allows you to manage the objects currently added to the HMI page or HMI symbol page. Using the Object Explorer, you can quickly access all the objects in the HMI page/symbol page and navigate through the object list. For groups of objects, the explorer shows the object hierarchy in a tree structure. The explorer allows you, for example, to copy and paste objects, delete objects, move objects/groups of objects up or down (change the z-order of the objects), etc.The HMI object explorer is not visible in the HMI editor by default. To open the explorer, click the  button on the editor's toolbar. Alternatively, right-click into the HMI page and select the 'Show/Hide Object Explorer' menu item from the context menu. button on the editor's toolbar. Alternatively, right-click into the HMI page and select the 'Show/Hide Object Explorer' menu item from the context menu.To close the explorer, click the button again or click the 'Close' icon on the right of the explorer's title bar.See the topic "HMI Object Explorer" for further details. |
