Editing and Filtering Text Lists
Editing text lists
- Open the text list editor group in the editors area by double-clicking the text list in the COMPONENTS area.The editor group contains two editors: the 'Text List' editor which is used to create and edit the text list entries and the 'Resources' editor which is used to enter the translations of the text list entries (see "Translating text lists").
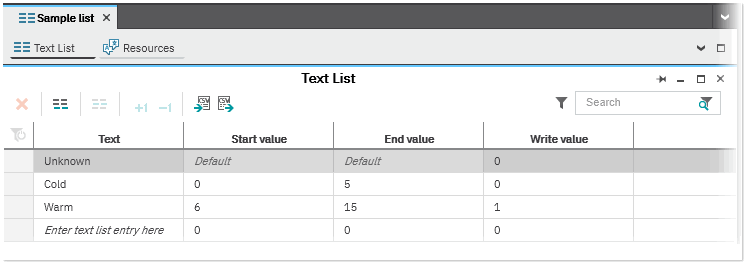
- Open the 'Text List' editor.Each text list entry consists of the text string, a start and end value and a write value. The start and end values define the value range which serves as the selection criterion for the text list entry at runtime. That means, if the variable (HMI tag) selected for the 'Text list' dynamic is within the specified range, the corresponding text list entry is shown in the visualization. The write value defines the value which is written to the variable (HMI tag) selected for the 'Text list' dynamic at runtime when the text is selected by the user.In order to prevent that an empty element is shown in the visualization if the value of the variable is not within any value range, you can enter a default string in the first (grey-colored) line of the table (the start and end value cannot be set for the default string). To write a specific value to the bound variable at runtime when the variable value is not within any value range or if the default text is selected by the user, you can enter the desired value in the 'Write value' column.
- Add a text list entry at the end of the list by clicking the
 button on the toolbar. Alternatively, left-click into the empty 'Enter ... here' input field, enter the text string and confirm with <Enter> or use the context menu command 'Create Text List Entry'. To add a new text list entry between existing ones, select the table rows between which you want to insert and then click the
  button on the toolbar.When adding new list entries, the following applies:(To delete a text list entry, select the table line and press <Del> or click the 'Delete' button on the toolbar.)
- The start, end, and write values are automatically selected, taking the existing values into account.
- If a series of values is detected, the series is continued, otherwise it is incremented by 1.
- The 'Text List' editor supports basic editing operations such as copying, pasting and cutting text list entries.
- In the 'Text' column enter the desired text to be shown in the visualization at runtime.
- In the 'Start value' and 'End value' columns enter the start and end value (values must be integer values).
You can increment or decrement the value ranges (start, end, and write value) of one or several list entries by 1 using theNote
The value ranges of text list entries may not overlap. Overlapping values are displayed as errors. or
or  button on the toolbar.
 - In the 'Write value' column enter the value (integer value) that is written to the variable at runtime when the text is selected by the user.
- Optional: In the first line of the table, enter a default text string and a write value. The default value is shown in the visualization if the value of the variable connected to the 'Text list' dynamic is not within any value range. The write value is written to the bound variable at runtime when the variable value is not within any value range or if the default text is selected by the user.
You can now assign your text list with the 'Text list' dynamic to an HMI object and display a specific text list entry depending on the value of a connected integer variable (see "Making text lists dynamic").
Filtering text lists
You can filter the text list entries by their properties or by text. To filter the entries by their properties, click the  icon next to the search field at the top right above the table and mark the corresponding properties to activate the related filter.
An activated filter is indicated by the framed filter icon and the
icon next to the search field at the top right above the table and mark the corresponding properties to activate the related filter.
An activated filter is indicated by the framed filter icon and the  icon shown in the top left-hand corner of the table. To deactivate a filter, click the filter icon again and deactivate the related properties.
To filter the text list entries by text,
enter the search text into the 'Search' input field at the top right above the table. The search operates on all visible texts in the table.
Deactivate the search by clicking the  icon on the right of the 'Search' input field.
| Note
The 'Search' field is limited to 50 characters. |