Creating Instances of HMI Symbols / Editing Symbol Parameters
An instance of an HMI symbol is created by inserting the HMI symbol via drag and drop from the COMPONENTS area into the HMI page. The instance is a copy of the original HMI symbol, i.e., when you use the symbol in an HMI page, an instance of the symbol is used. Any changes made to the symbol instance, for example, resizing or rotating the instance, are only applied to the copy of the HMI symbol, the original symbol is not affected. However, when you edit the original HMI symbol, these changes are immediately applied to all of the instances of that symbol.
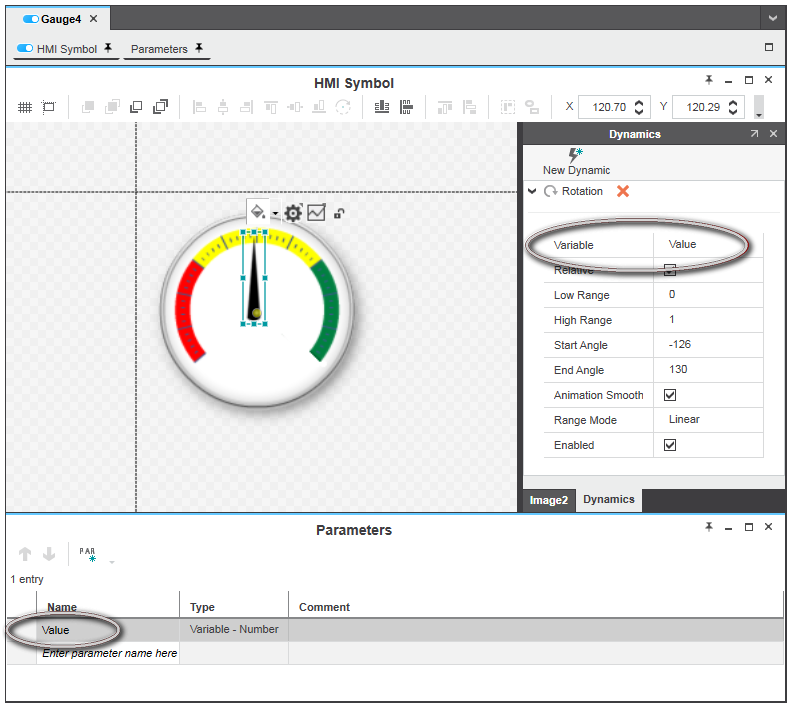
After having inserted a symbol instance into an HMI page, you have to assign each public symbol parameter to an HMI tag, HMI page or constant value. Otherwise, an error is reported in the Error List (MESSAGES window). This way, the symbol is animated based on the value of an IEC variable or the application can be operated via the HMI symbol.
Nested HMI symbols: You can nest one HMI symbol (the contained symbol) within another HMI symbol (the containing symbol) by adding the contained symbol to the containing symbol definition. This allows you, for example, to re-use the contained symbol in different containing symbols. PLCnext Engineer supports a maximum nesting depth of four levels. If this limit is exceeded, a corresponding error message is reported in the Error List (MESSAGES window).
For assigning the symbol parameters of HMI symbols, the 'Parameters' tab is provided in the properties window of the symbol instance. Set up the parameters of a symbol instance after inserting it into an HMI page as described in the following procedure.
| Note
Properties of HMI symbols, which have been published as editable by the symbol designer within the HMI symbol, are provided on the 'Settings' tab in the properties window of the symbol instance. |
- Select the symbol instance in the HMI page.
- In the properties window, open the 'Parameters' tab. The 'Parameters' tab provides all parameters which are defined for the HMI symbol. All parameters shown must have a valid value (constant, variable or variable path) assigned. Otherwise, an error is reported in the Error List (MESSAGES window).
Note
In case of a nested HMI symbol, the parameters of the contained symbol are bound to the parameters of the containing symbol. This means, the assignment of the symbol parameters of the contained symbol have to be done on the 'Parameters' tab of the containing symbol page. (You can open the symbol page by right-clicking the symbol instance and selecting 'Go To Symbol Definition' from the context menu.) - Assign a value to each parameter of the symbol instance. For each parameter, select the 'Source Type' and enter the 'Source Value'. The 'Source Type' defines the (data) type of value to be written to the symbol parameter at runtime and the 'Source Value' the value that is written to the symbol parameter. Depending on the type of the symbol parameter, the 'Source Type' drop-down list provides the following options:
| 'Source Type' | Description |
|---|---|
| 'Constant' | A constant of the data type expected by the symbol parameter must be entered as 'Source Value'.For example, if the symbol parameter is of data type 'Variable - BOOL', only the values 'True' or 'False' are allowed as 'Source Value' and for a symbol parameter of data type 'Variable - ANY_DATE' only a date constant (e.g. LDATE#2020-01-01) is allowed. |
| 'Variable' | An HMI tag of the data type expected by the symbol parameter or an expression built from HMI tags or variables must be entered as 'Source Value'.For example, if the symbol parameter is of data type 'Variable - ANY_STRING', only an HMI tag with a string-based project variable assigned is allowed as 'Source Value'.Clicking into the 'Source Value' field opens the role picker with the project's variables and HMI tags matching the data type of the symbol parameter.If the desired HMI tag is not offered in the list, create it as described in the topic "HMI Tags".
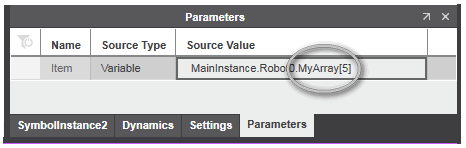
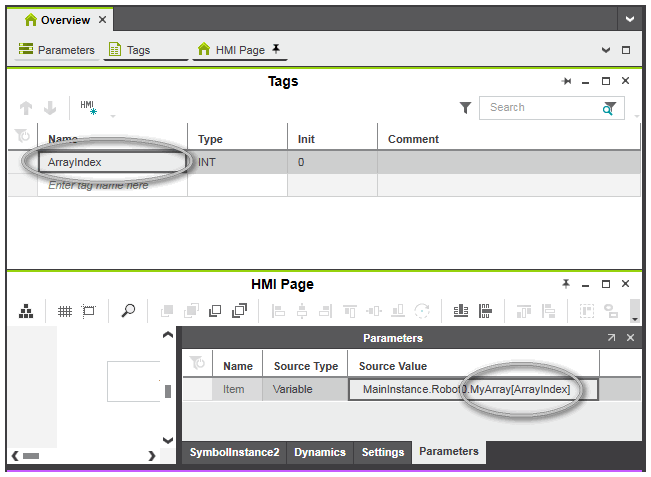
Accessing elements of array variables:
Elements of an array variable can be accessed by specifying an array index in square brackets following the variable name of the array. The array index can be either a constant index (integer number) or a variable index (page local tag of type INT).
 Examples Examples
|
| 'Variable Path' | Only available, if the symbol parameter is of type UDT (user-defined data type).The 'Variable Path' option allows you to dynamically bind symbol parameters to a valid HMI tag using a string expression. Dynamic binding means, the string expression entered as 'Source Value' is evaluated to a valid HMI tag identifier at page load time. This allows to dynamically build the HMI tag identifier from the basis of the HMI tag instead of specifying it statically.Suppose your system contains 100 stations and they are all the same, i.e., they are all connected to the same HMI symbol. Each station is represented by an FB instance. Without dynamic binding, you have to create an individual HMI page with the HMI symbol for each FB instance. Dynamic binding now allows you to have one generalized detail page containing the HMI symbol that can be reused for each FB instance. Example: Your project contains an FB of the type MyRobot of which three instances Robot0, Robot1 and Robot2 are used. MyRobot is a UDT (for example a structure with the array MyArray). The members of the FB are accessed via the HMI tag identifiers Robot0.MyArray[0], Robot1.MyArray[0], Robot2.MyArray[0], Robot0.MyArray[1] and so on.Instead of having a different HMI page containing the HMI symbol instance for calling an instance of the function block and accessing a member of MyRobot, the same HMI page (with the symbol instance) can be re-used for each function block instance by dynamically binding the symbol parameter to the basis of the HMI tag. This means, on HMI page load time the HMI tag identifier is built depending on the value which is passed to the symbol parameter.To achieve dynamic binding, the helper function GlobalTag() is provided (the function is provided by IntelliSense in the role picker). Example for a 'Variable Path' definition using the GlobalTag() function: GlobalTag('MainInstance.Robot' + RobotID) This example builds the HMI tag identifier from the string MainInstance.Robot and the variable RobotID of type string when the page containing the symbol instance is loaded. If, for example, RobotID is "1" at page load time (passed to the symbol parameter), the string "MainInstance.Robot1" is evaluated to the HMI tag identifier. |
| Note
Regarding their use in HMI pages, the following applies to variables of the Safety PLC:
|