Working with Text Lists
Text lists can be used for displaying various texts in the visualization at runtime depending on the value of a numeric variable (HMI tag). This allows you to show a descriptive and more meaningful text in the visualization instead of the numeric variable value. For example, you can use a text list to display the texts "COLD" and "WARM" at runtime if the variable value has a specific value or is within a specific range. The text list is made dynamic by assigning the 'Text list' dynamic with the referenced variable (HMI tag) to an HMI visualization object (for example, a text object).
To use the text lists in localized applications and show them in different languages, the text list entries can be translated into the languages as specified in the 'Extras > Options' dialog. You can also export text lists to a csv file, edit the file with another application, e.g., Excel and then import it.
This topic contains the following information:
Creating and managing text lists
The text lists are managed in the COMPONENTS area under the 'Local' folder in the 'HMI' category. Here you can do the following.
- Create a new text list. Right-click the 'Local' folder or any subfolder under the 'Text Lists' folder in the 'HMI' category in the COMPONENTS area and select 'Add text list' from the context menu. The new text list is added to the respective 'Text lists' subfolder with an editable default name.
- Organize the text lists into folders via the 'Add Folder' context menu command
- Move text lists between folders by using drag & drop.
- Delete existing text lists by selecting them and pressing <Del>.
Editing a text list
- Open the text list editor group in the editors area by double-clicking the text list in the COMPONENTS area.The editor group contains two editors: the 'Text List' editor which is used to create and edit the text list entries and the 'Resources' editor which is used to enter the translations of the text list entries (see below).
- Open the 'Text List' editor.Each text list entry consists of the text string, a start and end value and a write value. The start and end values define the value range which serves as the selection criterion for the text list entry at runtime. That means, if the variable (HMI tag) selected for the 'Text list' dynamic is within the specified range, the corresponding text list entry is shown in the visualization. The write value defines the value which is written to the variable (HMI tag) selected for the 'Text list' dynamic at runtime when the text is selected by the user.In order to prevent that an empty element is shown in the visualization if the value of the variable is not within any value range, you can enter a default string in the first (grey-colored) line of the table (the start and end value cannot be set for the default string). To write a specific value to the bound variable at runtime when the variable value is not within any value range or if the default text is selected by the user, you can enter the desired value in the 'Write value' column.
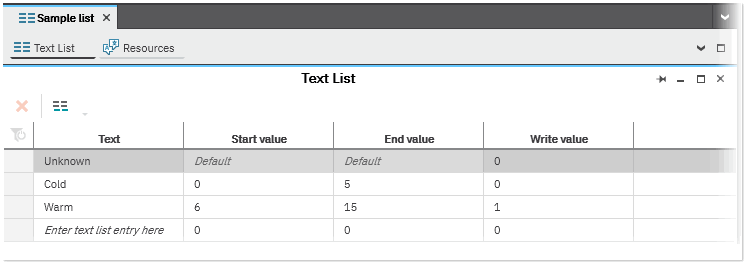
- Add a text list entry at the end of the list by clicking the 'Create new text list entry' button on the toolbar. Alternatively, left-click into the empty 'Enter ... here' input field, enter the text string and confirm with <Enter>.The 'Text List' editor supports basic editing operations such as copying, pasting and cutting text list entries.(To delete a text list entry, select the table line and press <Del> or click the 'Delete' button on the toolbar.)
- In the 'Text' column enter the desired text to be shown in the visualization at runtime.
- In the 'Start value' and 'End value' columns enter the start and end value (values must be integer values).
Note
The value ranges of text list entries may not overlap. - In the 'Write value' column enter the value (integer value) that is written to the variable at runtime when the text is selected by the user.
- Optional: In the first line of the table, enter a default text string and a write value.The default value is shown in the visualization if the value of the variable connected to the 'Text list' dynamic is not within any value range. The write value is written to the bound variable at runtime when the variable value is not within any value range or if the default text is selected by the user.
You can now assign your text list with the 'Text list' dynamic to an HMI object and display a specific text list entry depending on the value of a connected integer variable (see below "Making text lists dynamic").
Translating text lists using the 'Resources' editor
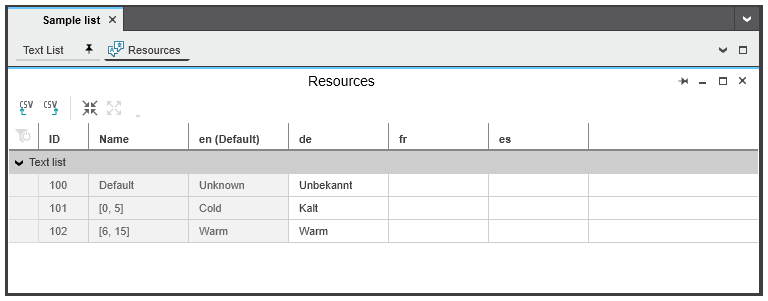
To use the text lists in localized applications, you can translate the text list entries. The translations of the text lists are entered using the 'Resources' editor in the text list editor group. In the 'Resources' editor, the default language and each alternative language (identified by its language code) is represented by a single column.
Which alternative languages are available depends on the selection you have made in the 'Options' dialog ('Extras > Options | International | Default Language Settings').
The 'Resources' editor contains a single line for each text list entry which is defined in the 'Text List' editor. Each text list entry consists of an ID, name and the source text in the default language and its translations. (The ID and name are read-only and created automatically; the name is created from the value range defined for the text list entry.)
To enter a translation string, enter the text in the corresponding language column and confirm with <Enter>.
| Further Info
Switching the language at runtime is done using the application local tag LanguageCode provided in the 'Tags' editor of the 'Application' PLANT node. By writing the desired target language to this tag, the displayed language of the HMI application can be switched at runtime. For an example how to use the tag, see "Localization of the HMI Application". |
Exporting and importing text lists
To export the text list entries to a semicolon separated csv file, click the  icon on the toolbar of the 'Resources' editor, specify a location and file name in the file open dialog, and click 'Save'.
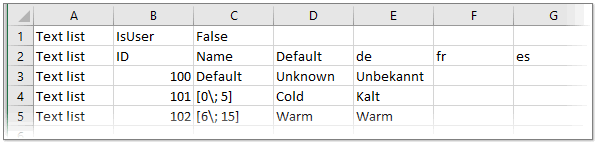
You can now edit the csv file in Excel or in any other text editor and then re-import the file (the following figure shows an exported csv file opened in Excel).
When editing the csv file, observe the following:
- Only the entries in the target language columns may be modified or added (in the following example, the columns "de", "fr", and "es"). Do not modify any other existing values.
- No new rows/columns may be added; no existing rows/columns may be deleted.
To import text list entries from a csv file back into you project, click the  button on the toolbar of the 'Resources' editor and select the edited csv file in the 'Open' dialog.
Making text lists dynamic
The text list entries can be made dynamic with help of the 'Text list' dynamic assigned to an HMI object. This allows to select the displayed text from a text list at runtime by changing the program variable connected to the 'Text list' dynamic.
The following procedure assumes the following:
- You have created a text list with several text list entries and value ranges as described above.
- The project contains an integer variable or an HMI tag of type integer.
- The project contains an HMI page.
Proceed as follows:
- Insert an object containing a label text (for example, a 'Text' or 'Check Box' element) into the HMI page.
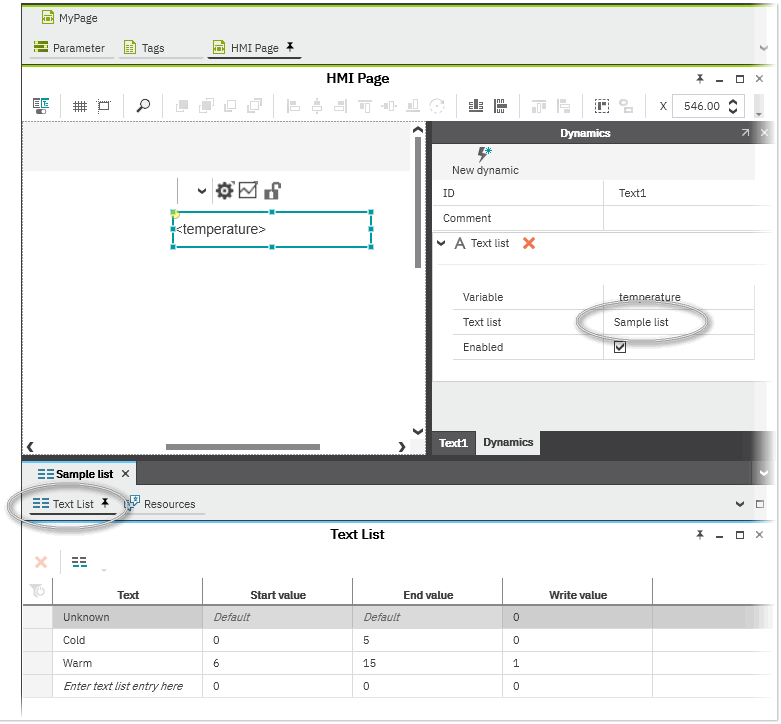
- Click the 'Dynamics' tab in the properties window of the object. If the properties window is not visible, right-click the object and select 'Show/Hide Settings' from the context menu or click the in-place button.On the 'Dynamics' tab, click the 'New Dynamic' button at the top of the tab and select the 'Text > Text list' dynamic.
- Connect a variable of type integer to the dynamic. To do so, click the input field right of the 'Variable' field and select a variable. The value of this variable determines which text is displayed in the HMI object when executing the HMI application. Depending on the value of the configured variable, the text entry from the associated text list is displayed at runtime.
- Connect the text list to the dynamic. To do so, click the input field right of the 'Text list' field and select the text list from which a text entry is displayed (the field provides all text lists for selection you have created in you project).
 Example