Creating and Designing HMI Symbols
Creating a blank HMI symbol
- Right-click the 'Local' folder or any subfolder under the 'Symbols' folder in the 'HMI' category in the COMPONENTS area and select 'Add HMI Symbol' from the context menu.
The new HMI symbol is added to the respective 'Symbols' subfolder with an editable default name. - You can add objects and HMI symbols (that making a nested symbol) to the symbol as described in the section "Designing HMI symbols" below.
Creating an HMI symbol from selected object(s)
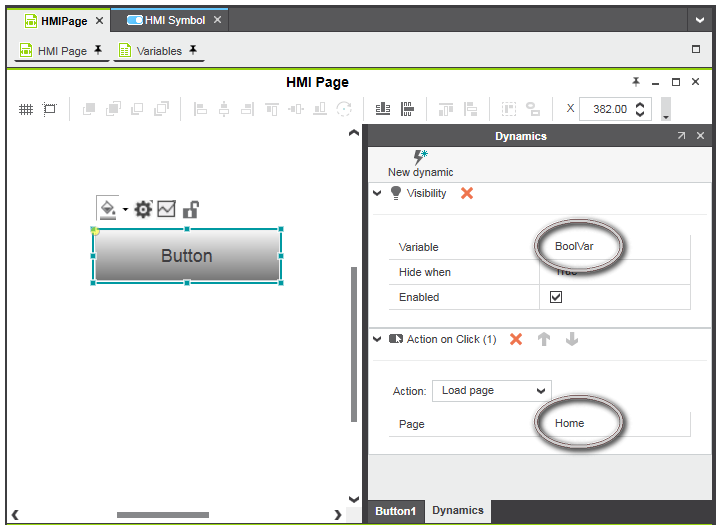
- Select the object(s) or symbol instance(s) in the HMI page which shall be included in the HMI symbol.
Note that the selection must not contain a symbol instance because it is not possible to create a symbol based on other symbol instances. - Right-click the selected object(s) and choose 'Create Symbol' from the context menu.
The new HMI symbol containing the selected object(s) is added to the 'Symbols' subfolder in the 'HMI' category (COMPONENTS area) with an editable default name.When creating a symbol from a selection of objects, the following applies:- The properties, dynamics and actions of included objects are transferred to the HMI symbol.
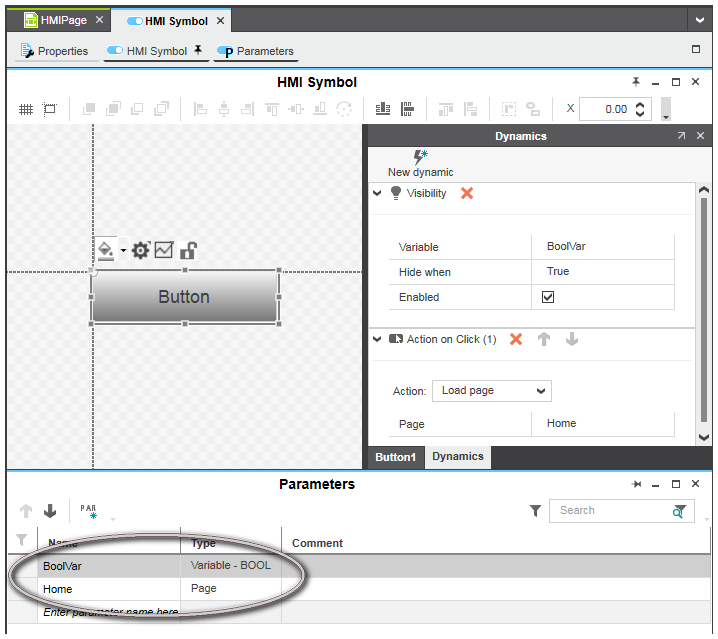
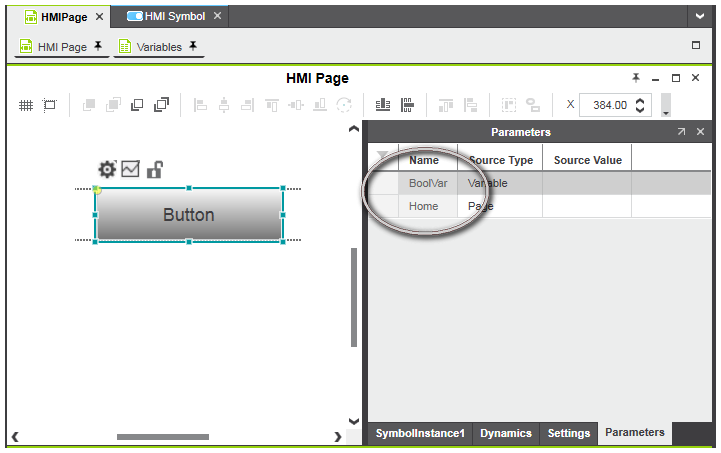
- Any existing assignment to an HMI page or HMI tag is automatically converted to a symbol parameter and added to the 'Parameters' editor provided for the HMI symbol. The names of the symbol parameters are automatically taken from the originally assigned references (see the following example).
- You can now add/delete/edit objects as described in the section "Designing HMI symbols" below.
 Example for creating an HMI symbol from selected object(s)
Designing HMI symbols
Each user-defined HMI symbol is edited on its own HMI editor page (hereafter referred to as symbol page). Double-clicking a user-defined HMI symbol in the COMPONENTS area under the 'HMI' category opens the page in the editors area. HMI symbols provided in a symbol library cannot be edited. In this case, double-clicking opens the symbol page in read-only mode.
Nested HMI symbols: You can nest one HMI symbol (the contained symbol) within another HMI symbol (the containing symbol) by adding the contained symbol to the containing symbol definition. This allows you, for example, to re-use the contained symbol in different containing symbols. PLCnext Engineer supports a maximum nesting depth of four levels. If this limit is exceeded, a corresponding error message is reported in the Error List (MESSAGES window).
The symbol parameters provided for the HMI symbol are edited using the 'Parameters' editor. The editor is opened/closed by clicking the 'Parameters' editor under the symbol page tab.
After having created an HMI symbol with one of the methods described above, the symbol content can be designed on the symbol page with the operations listed below. The steps for editing a symbol page are the same as for editing a "normal" HMI page (click the links for details).