Working with HMI Configuration Files
The HMI Generator uses the HMI configuration file to generate the HMI content from the project's IEC application code. To run the HMI Generator with an HMI configuration file, the file must be first added to the COMPONENTS in the PLCnext Engineer project and subsequently instantiated in the project (added to the PLANT). When instantiated, the HMI Configurator can be executed in order to generate the HMI content based on the configuration file.
This chapter includes the following sections:
| Further Info
An example of an XML configuration file can be found in the topic "HMI Configuration Sample". For the description of the elements and attributes allowed in the configuration file, see the topic "HMI Configuration File Elements and Attributes". |
Adding and instantiating HMI Configuration Files
The following procedure assumes that you have manually created a valid XML configuration file that conforms to the XML schema (XSD) for the configuration file.
Proceed as follows:
- In the COMPONENTS area, open the HMI category and select the command 'Add HMI Generator Configuration' from the context menu of the 'Local' folder.
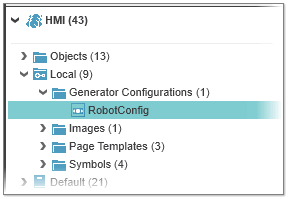
- In the file open dialog, select a configuration file (XML file) you want to add and click 'Open'. It is now checked, whether the XML file is valid and conforms to the XML schema.If the file is valid, the file is added to the 'Generator Configurations' subfolder under the 'Local' folder as shown below for the RobotConfig file (the subfolder is generated if it does not exist). The import is rejected, if the XML file is invalid (a corresponding desktop alert is displayed). The validation errors are logged in the PCWorxNext.log file which is located in the PLCnext Engineer installation directory.If the project already contains added configuration files, you can also call the 'Add HMI Generator Configuration' command from the context menu of the 'Generator Configurations' subfolder,
 Repeat this step for all configuration files you want to add.
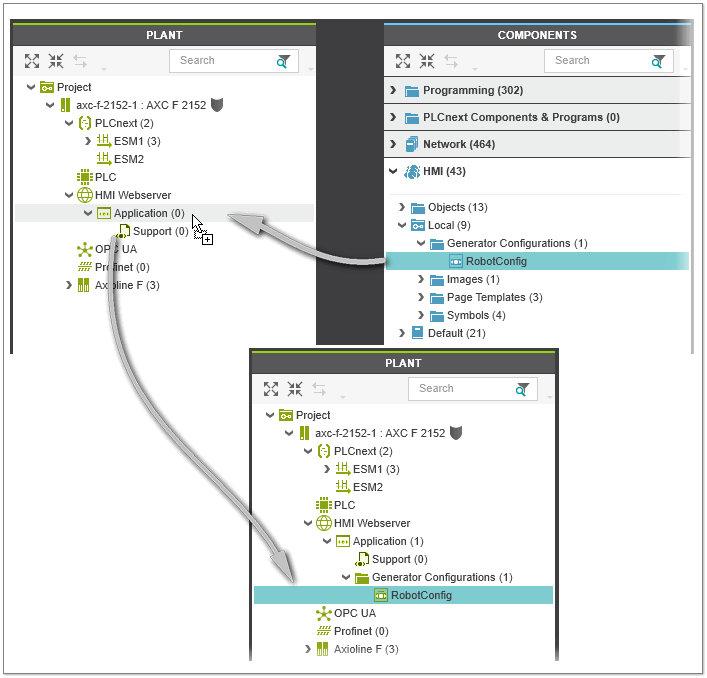
 - To instantiate a configuration file in the PLCnext Engineer project, the file must be added under the 'Application' node (child node of the 'HMI Webserver' node) in the PLANT. Observe the following when instantiating configuration files:Drag the file from the 'Generator Configurations' subfolder in the COMPONENTS area to the 'Application' node in the PLANT as shown below. If no configuration file is instantiated yet, the 'Generator Configurations' subfolder is created under the 'Application' node with the configuration file in this folder (the node is named as the file name). If the subfolder already exists, the configuration file is added to the folder.
- If an instantiated configuration file with the same name as the file to be instantiated already exists, no file is added.
- If a configuration file is instantiated and the corresponding file was removed from the COMPONENTS (see the following section), adding a file with the same name activates all instances of the same name.
 To instantiate a configuration file from an external (included) library, drag the file from the 'Generator Configurations' subfolder under the library folder in the COMPONENTS area to the 'Application' node in the PLANT. In the PLANT, the node is named as follows: "configuration file name: library name".
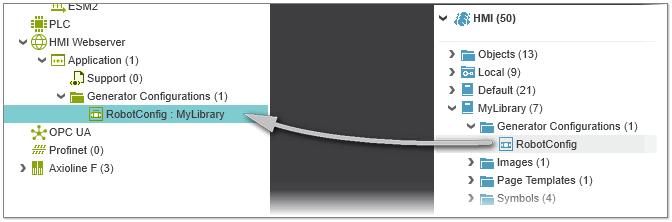 Repeat this step for all configuration files you want to instantiate.
 - Once you have instantiated the configuration file(s), you can execute the HMI Generator for a specific configuration file or for all instantiated configuration files (see below).
Removing HMI configuration files
To remove a configuration file from the COMPONENTS, select the corresponding entry and press <Del> or call the 'Delete' command from the context menu of the file. Removing a configuration file from the COMPONENTS does not remove the instantiated configuration file under the 'Application' node. To remove an instantiated configuration file, select the corresponding node in the PLANT and press <Del> or call the 'Delete' command from the context menu of the node.
Executing the HMI Generator
Once you have instantiated one or several configuration files as described above, you can execute the HMI Generator once or multiple times (see below) for one or several configuration files and generate the associated HMI content if the following prerequisites are met:
- The project is successfully saved and compiled. Use the 'Project > Rebuild' command to compile the project, if required.
- There is no build process currently running.
- A corresponding type with the same name as the instantiated configuration file is available in the COMPONENTS area under the 'HMI' category.
The HMI Generator is executed via the command 'Generate HMI content'. Whether the generation of the HMI content is done for a single configuration file or several files, depends on the PLANT node on which the generate command is executed. The generate context menu command is available for the following folders/nodes in the PLANT:
- 'Application' node: Generates the HMI content for all recursively underlying configuration files. By default, the configuration files are executed in the order they appear under the node (the order can be modified by using the <index> element in the configuration file).
- 'Generator Configurations' folder: Generates the HMI content for all recursively underlying configuration files. By default, the configuration files are executed in the order they appear under the folder (the order can be modified by using the <index> element in the configuration file).
- Configuration file: Generates the HMI content for the selected configuration file.
| Note
If you have externally modified a configuration file since the last time you executed the HMI Generator for the instantiated file, you have to remove the file from the COMPONENTS (see above) and import it again to consider the modifications. |
Proceed as follows to start the HMI Generator:
- Ensure that the project is successfully compiled and saved. Rebuild and save the project, if it has been modified.
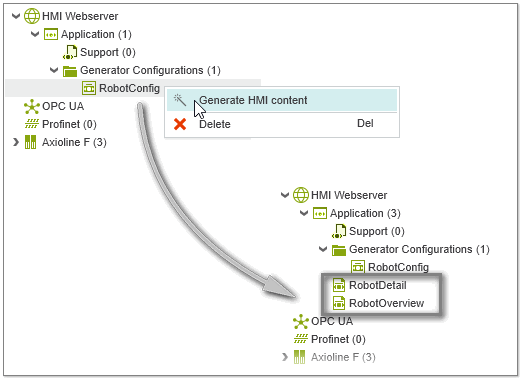
- In the PLANT, right-click the 'Application' folder, 'Generator Configurations' folder, or a configuration file node and select the 'Generate HMI content' command from the context menu. The project is closed and reopened.Based on the configuration file(s), the HMI pages, HMI symbols, etc. are generated and added to the project as shown in the following example. Here, the HMI pages 'RobotDetail' and 'RobotOverview' have been generated for the configuration file 'RobotConfig'.
Note
Information on the generation process is recorded in the Project Log in the MESSAGES window. If there are any errors detected during command execution or generation of the HMI content, corresponding error messages are generated in the log. - Optional: After completion of the generation process, you can edit the created HMI objects as usual.
Re-executing the HMI Generator
When re-executing the HMI Generator for an externally modified configuration file, observe the following:
- New symbols are created.
- New pages are created again.
- The location of symbols and groups (position, angle of rotation, size) on existing HMI pages is retained.
- Manually added images or symbols to existing HMI pages are preserved.