Localization of the HMI Application
PLCnext Engineer supports the translation of HMI texts into other languages. This allows you to create multilingual HMI applications. Using the predefined application local tag LanguageCode, the language of user-defined text strings (e.g., object labels, text list entries etc.) can be switched at runtime.
This topic provides the following information:
Selecting the default language and target languages
Precondition for using the localization feature is that a default language and at least one alternative (target) language are set in the 'Options' dialog:- Select 'Extras > Options'.
- Click the 'International' folder and select the 'Default Language Settings' category.
- Choose a 'Default' language.
- Define the alternative languages (target languages to be switched to): In the 'Available' group, select the respective entry and click 'Add Alternative'. The language is added to the 'Alternative' group (shows the list of available national languages in the project). Repeat this step for the desired languages.(You cannot add own languages to the 'Available' group.)
- Confirm the 'Options' dialog with 'OK'.
- Restart PLCnext Engineer to apply the changes.
Translating HMI texts using the 'Resources' editor
The translations of the HMI texts are entered using the 'Resources' editor. The 'Resources' editor is available for HMI objects containing a static text or a dynamic text.
- Static texts are texts which cannot be modified while the HMI application is executed (a static text is entered on the HMI object's properties page under the 'Text' category). The language of a static text can only be switched by writing the language code to the LanguageCode tag (see below). The translations of the static texts are managed in the 'Resources' editor of the 'Application' PLANT node (under the 'HMI Webserver').
- In contrast to a static text, a dynamic text can be modified at runtime. That means, the text of the HMI object can be displayed in different languages depending on the value of a program variable (HMI tag). A text is made dynamic by assigning a 'Text list' dynamic to an HMI object and connecting a program variable to the dynamic. The translations of the text list entries for dynamic texts are managed in the 'Resources' editor of the text list editor group (you open this editor group by double-clicking a text list in the COMPONENTS area under the 'Text Lists' folder in the 'HMI' category).
 'Resources' editor for dynamic texts
Further Info
For details on managing and using text lists, refer to the topic "Working with Text Lists".
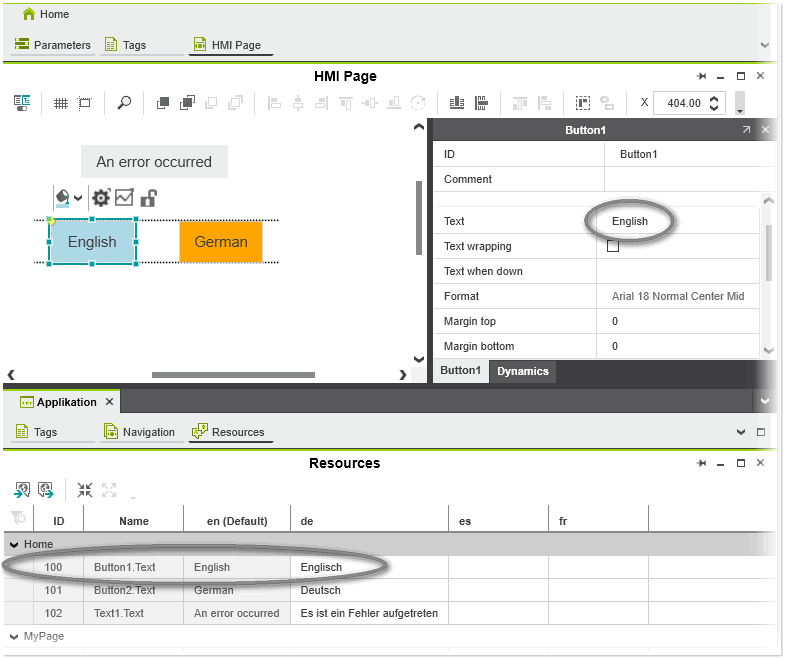
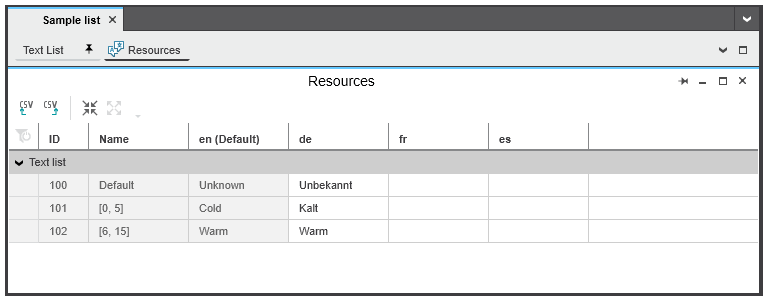
The 'Resources' editors for static and dynamic texts have the same behavior and appearance. The default language and each alternative language (identified by its language code) is represented by a single column. Which alternative languages are available depends on the selection you have made in the 'Options' dialog (see the description above).
To enter a translation string, enter the text in the corresponding language column and confirm with <Enter>.
Exporting and importing translations
To export the text list translations entered in the 'Resources' editor to a csv file, click the  icon on the toolbar of the 'Resources' editor, specify a location and file name in the file open dialog, and click 'Save'.
| Note
The delimiter (for example, comma or semicolon) used for the csv file is taken from the list separator setting defined in the Windows regional settings. |
You can now edit the csv file in Excel or in any other text editor and then re-import the file (the following figure shows an exported csv file opened in Excel).
When editing the csv file, observe the following:
- Only the entries in the target language columns may be modified or added (in the following example, the columns "de", "fr", and "es"). Do not modify any other existing values.
- No new rows/columns may be added; no existing rows/columns may be deleted.

To import text list translations from a csv file back into your project, click the  button on the toolbar of the 'Resources' editor and select the edited csv file in the 'Open' dialog.
Switching the language for HMI texts at runtime
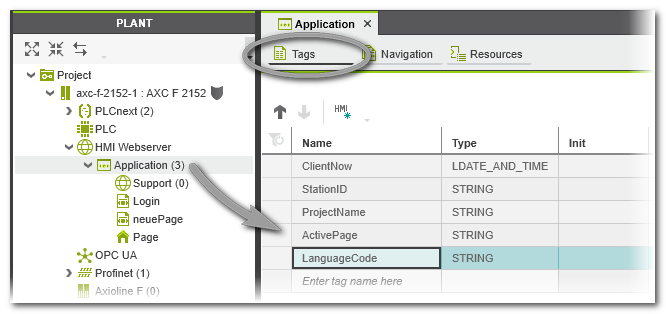
The language used for the HMI texts in the HMI application can be switched by using the predefined application local tag LanguageCode (STRING data type). An application local tag is specific to one client (station) but shared among all HMI pages in your project. This tag is listed in the 'Tags' editor of the 'Application' PLANT node. By writing the desired target language (language code) to the LanguageCode tag (e.g., using a 'Write Value' action of an HMI object), the displayed language of the HMI application can be switched at runtime.
| Note
As the HMI display language is switched by the HMI client, several clients could use different languages. |
Example
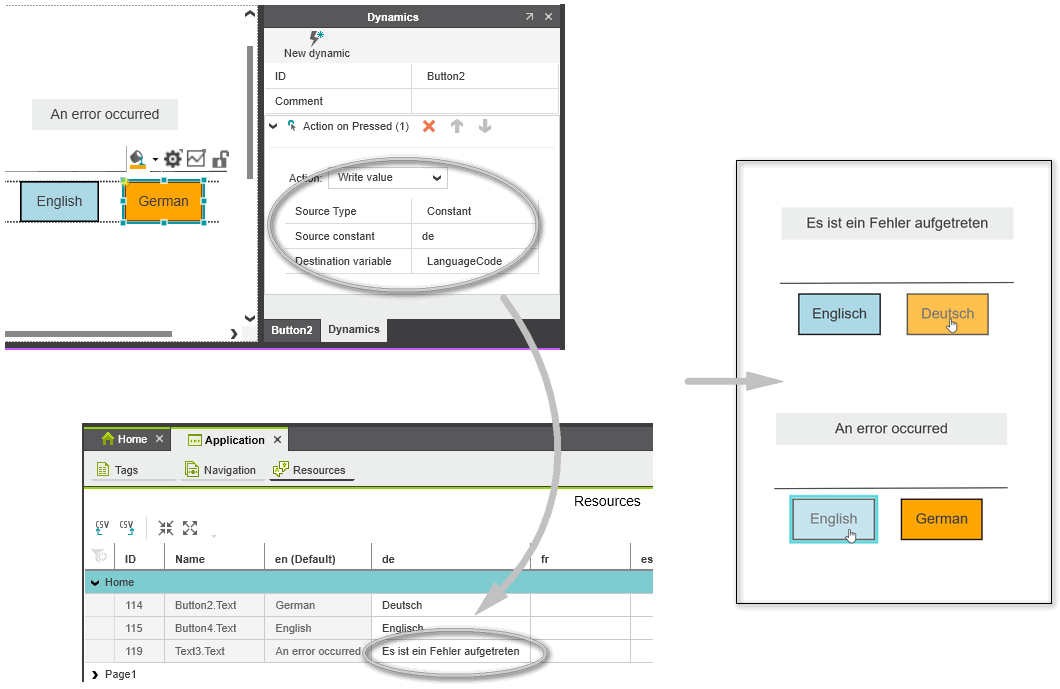
The following example configuration describes how to configure the language switching at runtime between English and German using two button objects. The procedure assumes that you have created an HMI page containing a text object labeled with, for example, 'An error occurred' and entered the corresponding German translation in the 'Resources' editor of the 'Application' PLANT node.
- Insert two button objects and label the buttons with 'English' and 'German' (the label for the text object is entered in the object's properties window on the general tab under the 'Text' category).
- Add an 'Action > Action on Pressed > Write value' dynamic to each button. For each button, set the 'Write value' parameters as follows:If a button is pressed in the HMI visualization, the HMI text as entered in the language-code column in the 'Resources' table is read and displayed for the HMI object. In our example, the German text 'Es ist ein Fehler aufgetreten' is displayed for the text object when the user presses the 'German' button at runtime.
- 'Source Type' = 'Constant'
- 'Source constant' = 'LanguageCode'. Replace LanguageCode by the language code as defined in the 'Extras > Options' dialog under the 'International | Default Language Settings' category (the language code is also shown in the 'Resources' editor of the 'Application' PLANT node). The selected value ('en' for English, 'de' for German) is written to the LanguageCode tag selected in the 'Destination variable' field when pressing the corresponding button at runtime.
- 'Destination variable' = 'LanguageCode'