Configuring the OPC UA Client Connections
The connection configuration for the OPC UA client comprises the configuration of the OPC UA server connections and the mapping of the variables (process data items) declared in the PLCnext Engineer project to the OPC UA server variables. The configuration is stored to an XML file on the PLCnext Technology controller. The file is based on the standard UA schema for data types.
| Further Info
For the schema documentation, see also the PLCnext Info Center. |
The configuration of the server connections and their properties as well as the variable mapping is done in the 'Client Connections' editor. To open the editor, double-click the 'OPC UA' PLANT node and activate the editor in the editors group.
This topic contains the following sections:
- Configuring the OPC UA server connections
- Data exchange between OPC UA client and OPC UA server
- Mapping variables in PLCnext Engineer
Configuring the OPC UA server connections
The OPC UA client uses the server connections to communicate with the OPC UA servers and to access the remote server variables (see the section "Mapping variables in PLCnext Engineer" below). The PLCnext Technology device establishes the connection automatically as soon as the server is available. For each server that wants to communicate with the client, a corresponding connection must be configured. To be able to communicate with the server, the client requires information about the server such as the server URL, the security mode and security policy used to connect to the server.
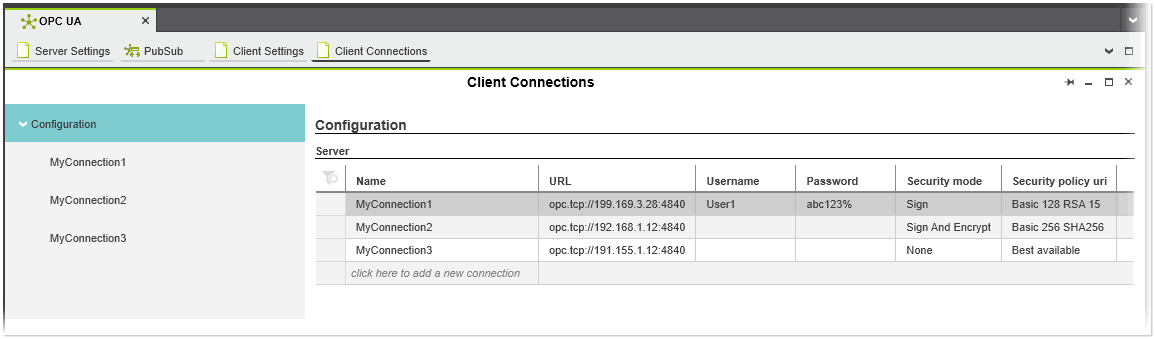
In the 'Server' table (as shown in the example), each table row represents a server connection. For each server connection the following properties can be configured:
| Property | Description | |
|---|---|---|
| Name | Name that identifies the server connection that is used for the data exchange. The connection must be specified for each variable mapping you create (see the "Mapping variables in PLCnext Engineer" section below). | |
| URL | Endpoint URL of the OPC UA server to connect to. The client uses the URL to find and connect to the OPC UA server. The format is as follows (see also the examples in the figure above):
opc.tcp://IpAddress:Port
or
opc.tcp://hostname:Port
Optionally the port can be specified. If omitted, the default OPC UA discovery port 4840 is used.
|
|
| Username | (Optional) User name to authenticate with the OPC UA server. If no username is entered, anonymous authentication towards the server is enabled. | |
| Password | (Optional) Password to authenticate with the OPC UA server. Only required if the username is specified. | |
| Security mode | Security mode used to connect to the OPC UA server. The security mode defines the level of security for the data being exchanged during client-server communication. You can choose one of the following modes:
|
|
| Security policy url | Security policy url used to connect to the OPC UA server. The security policy describes various algorithms and key lengths which are used to establish a secure connection between server and client. In accordance with the OPC UA specification, you can choose one of the following security policies (from top to bottom, the encryption and signature strength increases):
|
Editing the 'Server' table
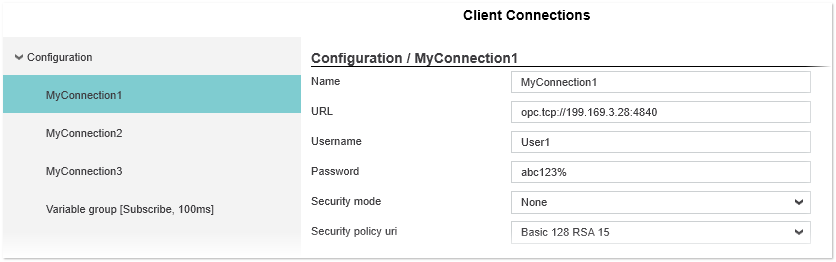
When you enter and confirm a connection name in the 'Server' table, the corresponding group appears under the 'Configuration' category on the left in the editor (as shown in the following example). The group shows the user-editable connection properties as entered in the 'Server' table. When you modify any property in the 'Server' table, the corresponding property in the connection group will be updated automatically and vice versa.
To delete a server connection from the 'Server' table, click in the first table cell and press <Del>.
Data exchange between OPC UA client and OPC UA server
The data exchange between OPC UA client and OPC UA server is realized via variables (process data items). By mapping the local variables (variables defined in the PLCnext Engineer project) to the remote server variables, data between client and server can be exchanged (see the section below how to map variables). The OPC UA client either subscribes to the variables of the remote OPC UA server or writes the changed values of the local variables to the remote server variables.
After the OPC UA client has established a connection to the server, it scans the address space of the server to find the variables available from the server. The address space contains information that the server makes visible to the OPC UA clients. In the address space the server variable is represented by a node. Each node is identified by a unique NodeId. The NodeId consists of the following three elements:
- Namespace - Namespace that contains the URI (Uniform Resource Identifier) to which the node is assigned. The namespace ensures that unique identifiers are used across the different naming authorities (the naming authority defines the identifiers of the NodeIds).
- Type - Format and type of the identifier of the NodeId. The type can be one of the following characters:
Type Description i Numeric (integer) valueExample: I=10 s String valueExample: s=test g GUID (Global Unique IDentifier) valueExample: g=1D73013A-5FAF-45D5-8F2E-DE97C4869873 b Base64 encoded valueExample: b=dGhvbWFz - Value - Identifier value for the node in the OPC UA server's address space.
Mapping variables in PLCnext Engineer
The mapping of the OPC UA client variables to the OPC UA server variables comprises the following steps:
- Adding variable groups and configuring the update intervalVariable groups are used to organize the variable mappings. The variable mappings contain a local variable and a description how to find the remote variable made available by the OPC UA server. A variable group can contain one or more variable mappings. For each variable group, the group type ('Subscribe' or 'Write') and the cycle time (update interval in ms for a cyclic write or subscribe) have to be specified.
- Adding variables to a variable group and mapping client to server variables
How to proceed:
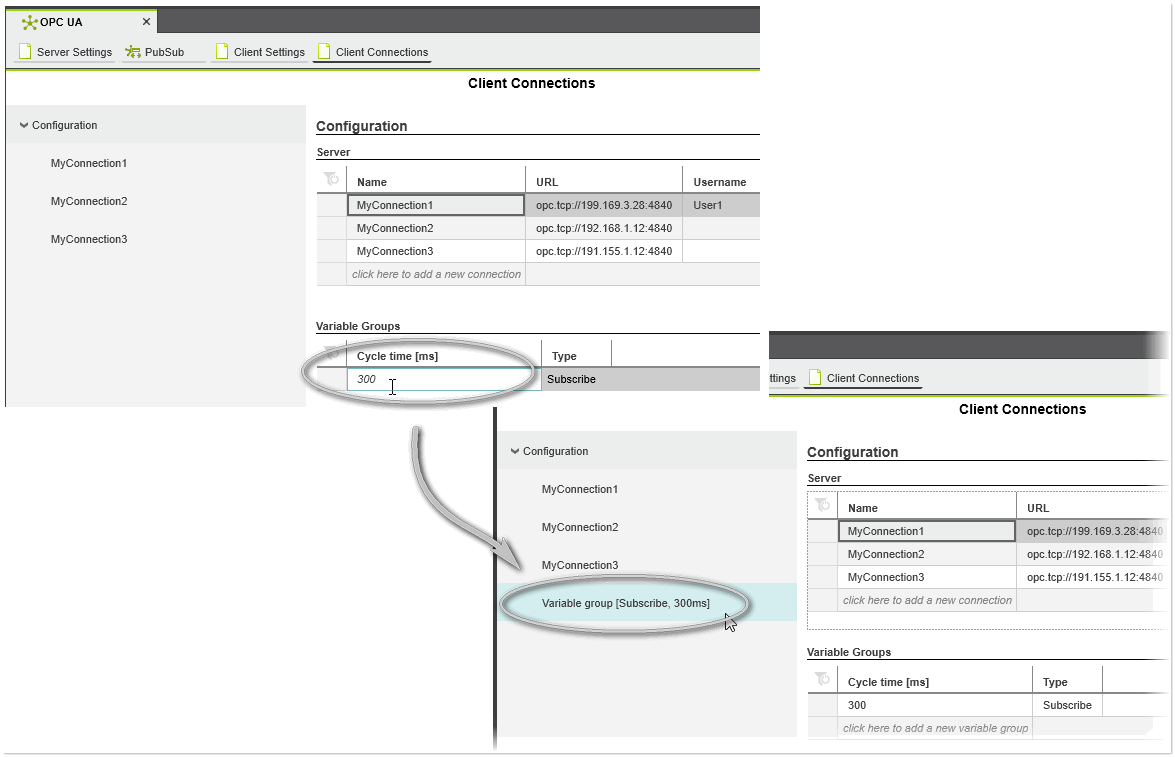
- In the 'Variables Groups' table in the 'Client Connections' editor, click into an empty cell in the 'Cycle time' column and enter a cycle time value (value must be greater or equal to 1). In the 'Type' cell, select the group type ('Subscribe' or 'Write').When you confirm the cycle time value, the new variable group appears under the 'Configuration' category on the left in the editor (see the following example). The group name shows the configured group type and cycle time. To delete a variable group from the 'Variable Groups' table, click in the first table cell and press <Del>.
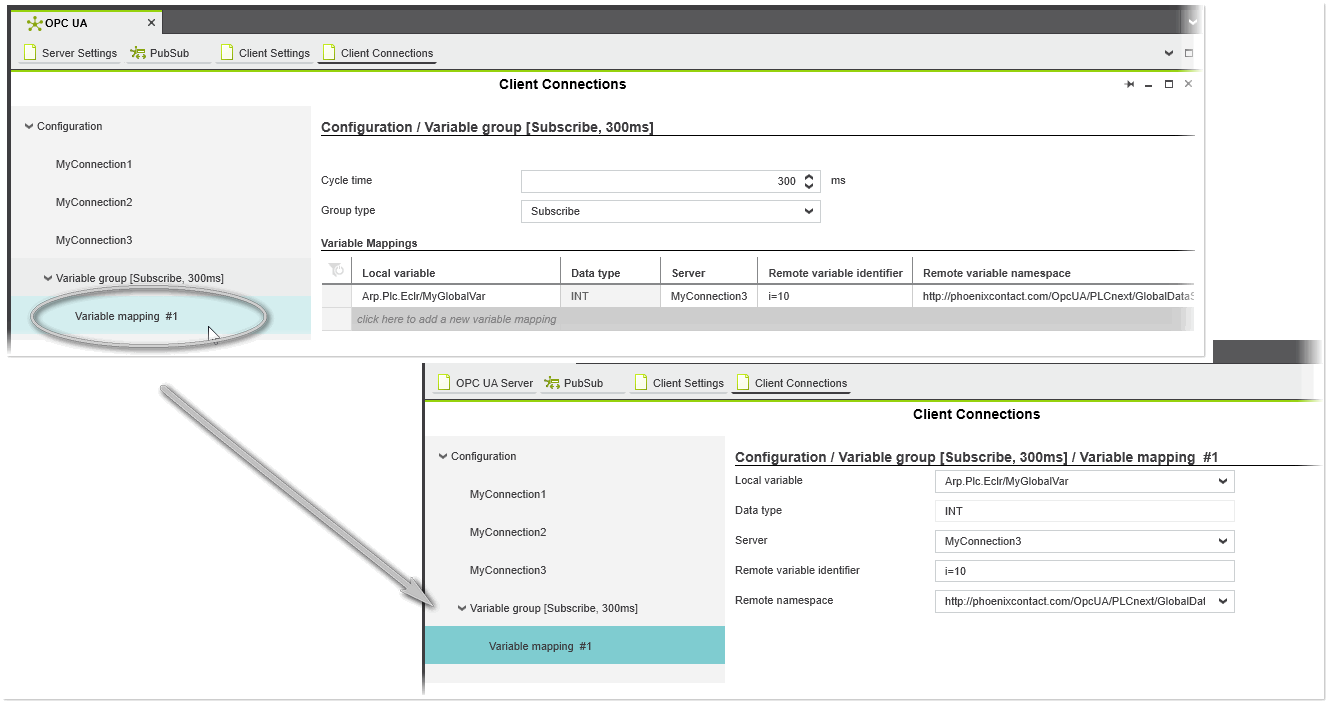
- To do the variable mapping, select the variable group under the 'Configuration' category. The group page with the group settings (cycle time and group type) and the variable mapping table is shown in the editor area (see the example below). When you modify any setting in the page, the corresponding setting in the 'Variables Groups' table will be updated automatically and vice versa.
- In the 'Variable Mappings' table, configure the following properties for each variable mapping:
When you select a local variable, the new variable mapping category appears under the 'Configuration > Variable group' category on the left in the editor (see the following example). The 'Variable mapping' category shows the user-editable variable properties as entered in the 'Variable Mappings' table. When you modify any property in the 'Variable Mappings' table, the corresponding property in the category will be updated automatically and vice versa.Property Description 'Local variable' Local variable to be mapped to the OPC UA server variable.Click into an empty cell and select the desired variable from the variables list. The selection list provides all variables/ports declared in your PLCnext Engineer project (except variables of the type STRING and STRUCT). (As long as no 'Remote variable identifier' is entered, the mapping is invalid.) 'Data type' Read-only data type of the local variable. 'Server' OPC UA server connection to be used for the data exchange.Select a connection from the connections list. The list provides all server connections you have configured in your project (see "Configuring the OPC UA server connections"). 'Remote variable identifier' Type of the identifier of the NodeId (see the description in the "Data exchange between OPC UA client and OPC UA server" section).Example: I=10 'Remote variable namespace' Namespace to which the node representing the OPC UA server variable belongs.Example: http://phoenixcontact.com/OpcUA/PLCnext/GlobalDataSpace/
 Example