WATCHES: Monitoring/Debugging the Safety-Related Application
This topic contains the following sections:
- Several independent watch lists
- Adding variables to WATCHES
- Saving and loading watch lists
- Content of a watch list
- Commands in the WATCHES window
- Setting the display mode
 | The WATCHES window can be used to collect variables and monitor their online values while the application is executed. This makes it unnecessary to open the individual code worksheets containing the variables to be monitored. For variables collected from safety-related POUs, the following applies:
|
Several independent watch lists
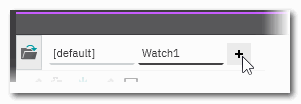
The WATCHES window provides the possibility to define up to 10 different watch lists where each list is placed in its own tab. Using the '+' icon, you can add a new watch list.
Each watch list is handled separately, i.e., the commands in the window toolbar and context menu relate to the active tab. The same applies when adding an element from a variable grid or the code via context menu.
Watch lists can be renamed and deleted via the context menu of the tab name. You change their order by dragging & dropping them.
The content of each list can be saved to and loaded from a file.
The watch lists are saved within in the PLCnext Engineer project and available when you load the project again.
Adding variables to WATCHES
| Note
The variables and ports added to the WATCHES window are saved within in the PLCnext Engineer project and available when you load the project again. |
Variables/Ports can only be added to the WATCHES window while monitoring mode or debug mode is active. Adding is possible from the following editors in online mode:
- Code worksheets
- Variables tables
- 'Data List' of the Safety PLC
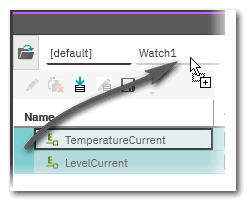
- Drag a variable/port from one of these online editors and drop it in the WATCHES window.If several watch lists are defined, you can drop the element inside the active list or (if a list is not active) onto the tab name.
- Use the command 'Add to WATCHES' in the context menu of variables.If several watch lists are defined, the command adds the element to the currently selected watch list (even if the WATCHES window is closed).
A variable/Port can only be added once to each watch list. Newly added variables/Ports are always added at the end of a list.
 Copying an element into another watch list
The WATCHES window content is saved locally on your computer when saving the project. This means that the watch list is restored in the WATCHES window when re-opening a project.
In addition, the content of each list can be saved to and loaded from an file.
Possible commands for the added elements
After adding elements to a watch list, you have the following possibilities (each of them applied to only one, several or all variables in a list):- Overwrite variables on the running controller with the value specified in the 'Value' field.
- Read the current online values from the controller and enter them into the 'Set Value' field
- Edit the 'Set Value' for each element manually.
- Overwrite variables on the running controller with the value specified in the 'Set Value' field.
Saving and loading watch lists
| Note
The WATCHES window configuration (list of variables, number of watch lists etc.) is saved within the current PLCnext Engineer project and available when you load the project again. |
Saving the whole contents of the active watch list to a file (*.wwr) makes it possible to "back up" a particular application state. Watch list files can be reloaded.
A *.wwr file has ASCII format with one line for each added variable. You can edit these values using a default text editor. As each line contains an automatically generated ID (supplemented by the instance path of the POU where the variable is used), it is not possible to manually insert new variables in a text editor.
How to save a watch list to a file
Content of a watch list
Each watch list (tab) of the WATCHES window shows the following information for each inserted variable:
| Column | Meaning |
|---|---|
| Name | Variable/Port name: In case of a function/function block input/output, the name is composed of the function/FB instance name and the input/output name separated by a dot. Example: P_GEN_1.Q. |
| Value | Current online value of the element. This is the value of the element between two task execution cycles.The value can be edited and written to the controller as force or overwrite value (context menu command 'Overwrite/Force' or toolbar button  ).
Forced values are shown in the following color gradients: ).
Forced values are shown in the following color gradients:
 / / Value forced to TRUE/SAFETRUE Value forced to TRUE/SAFETRUE / / Value forced to FALSE/SAFEFALSEThe display format of online values can be adapted. Refer to the section "Setting the display mode" for details. Value forced to FALSE/SAFEFALSEThe display format of online values can be adapted. Refer to the section "Setting the display mode" for details. |
| Set Value | The values in this column can be read from the controller and kept as predefined values. The toolbar button  fills the set value in the entire active watch list. To fill only particular rows, mark them in the list and select the context menu command 'Fill selected Set Values'. (Multiselection of elements is possible by holding the <Ctrl> or <Shift> key down while left-clicking the rows.)The set values can be used to overwrite the variables on the controller. The toolbar button fills the set value in the entire active watch list. To fill only particular rows, mark them in the list and select the context menu command 'Fill selected Set Values'. (Multiselection of elements is possible by holding the <Ctrl> or <Shift> key down while left-clicking the rows.)The set values can be used to overwrite the variables on the controller. The toolbar button  writes the set values of the entire active watch list. To overwrite only particular variables, mark them in the list and select the context menu command 'Overwrite from selected set values' (multiselection as described above). writes the set values of the entire active watch list. To overwrite only particular variables, mark them in the list and select the context menu command 'Overwrite from selected set values' (multiselection as described above). |
| Data type | Data type of the variable. |
| Instance | Location where the variable is used, including the unique instance path. |
Commands in the WATCHES window
| Toolbar button | Context menu command | Shortcut | Description |
|---|---|---|---|
 | - | - | Loads a saved *.wwr file and adds its content in a new watch list tab. |
 | Overwrite/Force (inside list) | <Ctrl> + <Alt> + <2> | Overwrites or forces the selected element with a defined value. Forced values are shown with a color gradient (see list above).Observe the note below this table. |
 | Unforce selected variables (inside list) | <Ctrl> + <Alt> + <3> | Resets the forced value to the actual value. Only active if the variable is forced.Observe the note below this table. |
| - | - | Loads the current value of all elements in the list from the controller and enters them into the 'Set Value' column. |
| - | Fill selected Set Values (inside list) | <Ctrl> + <Alt> + <4> | Loads the current value of the elements selected in the list from the controller and enters them into the 'Set Value' column. |
| - | - | Uses the value in the 'Set Value' column to overwrite all elements in the list on the controller.Observe the note below this table. |
| - | Overwrite with selected Set Values (inside list) | <Ctrl> + <Alt> + <5> | Uses the value in the 'Set Value' column to overwrite the elements selected in the list on the controller.Observe the note below this table. |
 | Save watch list (on list tab) | - | Saves the active watch list in a *.wwr file on disk or network drive. See section "Saving and loading watch lists" for details. |
| - | Load watch list (on list tab) | - | Loads the content of a *.wwr file into the active watch list. See section "Saving and loading watch lists" for details. |
| - | Rename (on list tab) | - | Allows to edit the watch list name. |
| - | Delete (on list tab) | - | Deletes the watch list. |
| - | Select All (inside list) | <Ctrl> + <A> | Selects all elements in the watch list . |
| - | Collapse (inside list) | - | For variables inserted from safety-related POUs, this command remains inactive because no user-defined data types to be expanded/collapsed are supported. |
| - | Delete (inside list) | <Del> | Removes the selected element from the watch list.Multiselection is possible, by using the 'Select All' context menu item or by selecting individual variables while holding the <Ctrl> key down while left-clicking. |
| Note
For variables inserted from safety-related POUs, this command is only available if debug mode of the Safety PLC is active. While the Safety PLC runs in monitoring mode, no debug commands on its variables can be executed. For detailed information on overwriting using the WATCHES window, see the topic "Debugging Safety-Related Code: Forcing/Overwriting". |
Setting the display mode
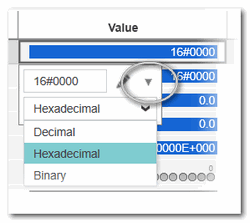
Some data types provide different possibilities of displaying their online values. To adapt the display, double-click the value of the variable. (Alternatively, right-click the variable and select 'Overwrite / Force' from the context menu or left-click the table line and press the shortcut <Ctrl> + <Alt> + <2>.) In the appearing Overwrite/Force control, click the drop-down arrow on the right and select the desired display format.
| Note
Independently of the WATCHES display mode, the displayed format of online variables in debug mode can be set via the 'Extras > Options' menu item. In the 'Options' dialog, select the category 'Options | Online Values' and specify the number of visible digits. |
| Display mode | available for | Meaning |
|---|---|---|
| Textual (True / False) | Boolean variables | Displays the value TRUE or FALSE with different background colors. |
| Label | Boolean variables with defined pragma | Displays the pragma label defined for the variable values TRUE/FALSE. |
| Label Highlighted | Boolean variables with defined pragma | Combines the displays of the pragma label defined for the variable values TRUE/FALSE with the background colors for TRUE or FALSE. |
| LED | ANY_BIT variables including BOOL | Displays an LED symbol instead of value or label: FALSE =  and TRUE = and TRUE =  In case of ANY_BIT variables > BOOL, one LED is shown per digit.
Example for a BYTE variable:  |
| Hexadecimal | ANY_BIT variables except BOOL | Displays the ANY_BIT variable as hexadecimal value with the prefix 16#. |
| Decimal | ANY_BIT variables except BOOL and ANY_REAL | Displays the ANY_BIT variable as decimal value. |
| Binary | ANY_BIT variables except BOOL | Displays the ANY_BIT variable as bit string with the prefix 2#. Example for a BYTE variable:  |
| Exponential | ANY_REAL variables | Displays the value in exponential representation. Example for an LREAL variable:  |
The set display mode is stored in the project with the WATCHES list.