Debugging Code: Forcing/Overwriting
This topic contains the following sections:
| Note
This topic only applies to the standard (non-safety-related) controller. The steps for the Safety PLC are described in the help chapter "Safety PLC Commissioning: From Compiling to Debugging ×‣ Connecting vs. Monitoring Mode vs. Debug Mode ×‣ Safety Cockpit: Controlling the Safety Application ×‣ Safety PLC Diagnostics out of the Safety Cockpit ×‣ Monitoring/Debugging the Safety PLC ×‣ Monitoring Mode: Displaying Online Values ×‣ Debugging Safety-Related Code: Forcing/Overwriting ×‣ WATCHES: Monitoring/Debugging the Safety-Related Application ×‣ Safety PLC Simulation ×". |
To supplement the function test, the editors provide several debug features in debug mode. For example, instead of pressing a button at the machine, you can force the corresponding input variable/port in the graphical editor. This enables monitoring the reaction of the application.
Debug functions are only available while PLCnext Engineer is attached to the application process, i.e., switched to debug mode.
In debug mode, the system provides the possibility of- overwriting local and global variables without assigned process data item (marker variables) and ports (even in non-IEC-61131-3-programs).
- forcing the following data items:
- global IEC variables which are connected to process data items, i.e., I/O variables.
- instance-related 'Program' variables.
Such variables result from program-global IEC variables with a data direction 'I/Q' selected. - ports used in IEC 61131-3 programs as well in externally developed and instantiated non-IEC programs.
Note
Depending on the controller type used, forcing may not be supported in the current version. - setting breakpoints.
|
WARNING
|
Unintended machine operation
|
Forcing and overwriting variables in debug mode
Both, forcing and overwriting means assigning a new value to a variable. Both operations are only possible while the software runs in debug mode.
What is the difference between forcing and overwriting?
- Overwriting is possible for local and global variables (marker variables without assigned process data item) as well as for I/O variables (assigned to process data items). The value is overwritten (set) only once at the beginning of the task execution cycle. Then, the variable is processed normally. Thus, the new value of the variable remains until a write access is performed. A write access can be performed by a programmed store operation or by remote access (e.g., by the OPC server) or by initializing the variable in case of a controller cold start.
-
Forcing is possible for variables and ports which are connected to process data items, i.e., I/O variables/ports. Forcing means setting the I/O variable/port permanently to the force value until forcing is reset by the user.Forcing takes place at the beginning and at the end of a program cycle. Within a cycle, the application may change the variable value by a write access. In this case, it is set to the force value again at the end of the cycle (until you unforce it).
Note
Depending on the controller type used, forcing may not be supported in the current version.
Forcing/overwriting can be done in online code worksheets, online variables tables/Data Lists/Port Lists, and in the WATCHES window.
To modify a force value or unforce variables/ports, additionally the FORCELIST window can be used.
Setting the display mode
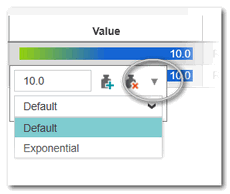
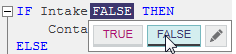
Some data types provide different possibilities of displaying their online values. To adapt the display, double-click the value of the variable. (Alternatively, right-click the variable and select 'Overwrite/Force...' from the context menu.) In the appearing control, click the drop-down arrow on the right and select the desired display format.
| Display mode | available for | Meaning |
|---|---|---|
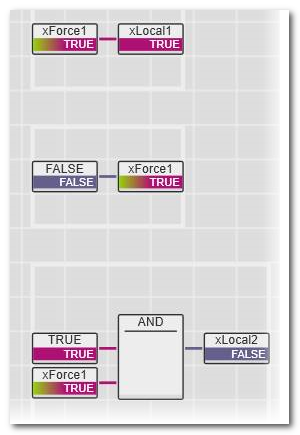
| Textual (True / False) | Boolean variables | Displays the value TRUE or FALSE with different background colors. |
| Label | Boolean variables with defined pragma | Displays the pragma label defined for the variable values TRUE/FALSE. |
| Label Highlighted | Boolean variables with defined pragma | Combines the displays of the pragma label defined for the variable values TRUE/FALSE with the background colors for TRUE or FALSE. |
| LED | ANY_BIT variables including BOOL | Displays an LED symbol instead of value or label: FALSE =  and TRUE = and TRUE =  In case of ANY_BIT variables > BOOL, one LED is shown per digit.
Example for a BYTE variable:  |
| Hexadecimal | ANY_BIT variables except BOOL | Displays the ANY_BIT variable as hexadecimal value with the prefix 16#. |
| Decimal | ANY_BIT variables except BOOL and ANY_REAL | Displays the ANY_BIT variable as decimal value. |
| Binary | ANY_BIT variables except BOOL | Displays the ANY_BIT variable as bit string with the prefix 2#. Example for a BYTE variable:  |
| Exponential | ANY_REAL variables | Displays the value in exponential representation. Example for an LREAL variable:  |
| Note
You can remove all display formats individually set for the online variables in the project via the 'Extras > Options' dialog. In the category 'Online | Online Values', press the 'Reset' button under the 'Reset all formatters of current project' group to reset the format. |
What do you want to do?
| Note
In order to debug user-defined functions/methods and/or to show the execution value (actual value at the code position) in online worksheets, you have to select the required extended debug option in the controller Cockpit. Refer to the sections "Extended debugging: execution values vs. "normal" online values" and "Extended debugging of user-defined functions, methods, and SFC actions/transitions" for details. |
 Force/overwrite a variable in an online code worksheet


Force/overwrite a variable in an online variables table or Data List

Force/overwrite a variable in the WATCHES window


