Adaptive Layout of HMI Symbol Instances
This topic contains the following sections:
General information
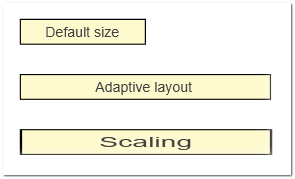
Adaptive layout of HMI symbols allows to resize instances of HMI symbols while preserving the selected original properties (text and line properties, etc.) of the symbol. This means, the content of the HMI symbol instance is not changed, but only its size and position when you resize it. For example, when you scale an HMI text symbol instance, i.e., enlarge or reduce the width or height of an HMI text symbol instance without adaptive layout, the whole symbol including the line widths and font size of the text changes (as shown in the bottom image in the following example). With activated adaptive layout, the HMI symbol instance behaves as configured in the symbol definition (top image in the example), i.e., the line widths and the font size are preserved and not affected by the resizing operation (middle image in the example).
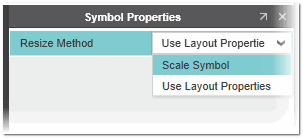
To control the layout of an HMI symbol, the HMI symbol editor provides the 'Resize Method' options on the 'Symbol Properties' tab in the properties window. You open the properties window with the 'Symbol Properties' tab by clicking on the background of the symbol editor. By default, an HMI symbol is a 'Scaling' symbol.
Resizing methods
The 'Resize Method' options on the 'Symbol Properties' tab (see above) lets you define how the instance of the HMI symbol behaves when resizing it. The following options are available:
| Option | Description |
| Scale Symbol | The whole HMI symbol instance is resized and scaled using a scaling transformation. The scaling transformation multiplies the original properties of the HMI symbol by the scaling factor (each coordinate is multiplied by the scaling factor).For example, when resizing a symbol instance composed of a rectangle with an outline and a text field, then the width of the outline (i.e., the outline thickness) and the text width are affected by the resizing operation. This means, the outline thickness and the font size are enlarged or reduced when, for example, dragging a size handle.
Note
Scaling symbols can be reduced to a smaller size than the default when resizing. |
|
| Use Layout Properties | The HMI symbol instance retains its original properties when resizing it. The content of the symbol instance will not be changed, i.e., the size of the symbol instance is adjusted based on its content.For example, when resizing a symbol instance composed of a rectangle with an outline and a text field, then the width of the outline does not become thicker and the text size is retained when scaling the object.
Note
The content within layout properties symbols can expand to fit an increased symbol instance size but cannot shrink below its original size from the symbol definition. Therefore, when designing such symbols, create the content in the smallest intented size. |
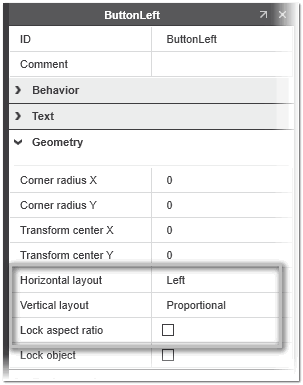
After selecting the 'Use Layout Properties' resize method for an HMI symbol, new layout properties as shown in the following example appear in the properties window for any selection of HMI objects within the symbol, in the 'Geometry' category. (For a description of the properties and examples how to use them, see the following sections.)
 |
Layout properties
For an HMI symbol with selected 'Use Layout Properties' resize method (see above), the following layout properties can be set for any object within the HMI symbol, in the 'Geometry' category:
| Layout property | Description |
| Horizontal layout | Defines how the object is aligned horizontally when resizing the HMI symbol instance. The following options are available:
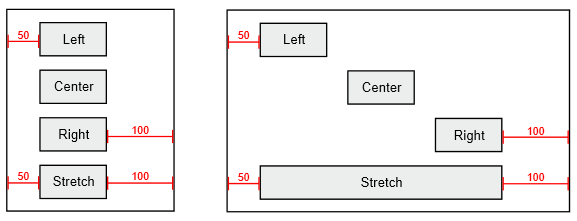
- Left - The object is left-aligned to the leftmost part of the container (an HMI symbol or group). The object maintains its distance to the leftmost part of the container when resizing the symbol. All of the extra space will be placed to the right and none of it will be on the left.
- Center - The object is centered between the left-aligned and right-aligned objects within the HMI symbol. Half of the extra space will be placed to the right of the object and the other half will be placed to the left when resizing the symbol.
- Right - The object is right-aligned to the rightmost part of the container (an HMI symbol or group). The object maintains its distance to the rightmost part of the container when resizing the symbol. All of the extra space will be placed to the left and none of it will be on the right.
- Stretch - The leftmost point of the object is left-aligned to the leftmost part of the container (an HMI symbol or group) and its rightmost point is right-aligned to the rightmost part of the container. This means, the object is anchored to both the left and to the right of the container.
- Proportional - The object and the space around the object within the HMI symbol definition are expanded in the same manner.
 Examples Examples
The following example illustrates the four horizontal layout options: 'Left', 'Center', 'Right', and 'Stretch'. The graphic shows the content of an HMI symbol definition in the default size (left image) and an instance of that symbol that has been widened (right image).
The following example shows an HMI text object with 'Horizontal layout' set to 'Proportional'. The object is 40% of the width of the HMI symbol, as measured from the leftmost point to the rightmost point in the HMI symbol definition. The margin to the left of the object is 20% of the width of the symbol. If the width of the HMI symbol instance is doubled, the object is 40% of the new width of the symbol instance and the margin is 20% of the new width.

|
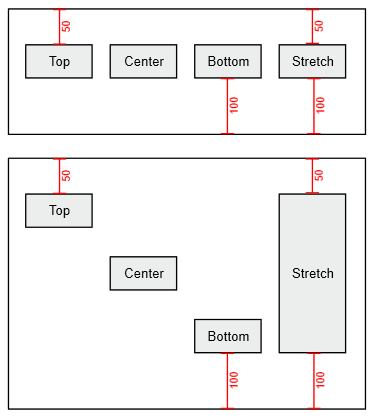
| Vertical layout | Defines how the object is aligned vertically when resizing the HMI symbol instance. The following options are available:
- Top - The object is top-aligned to the topmost part of the container (an HMI symbol or group). The object maintains its distance to the topmost part of the container when resizing the symbol. All of the extra space will be placed to the bottom and none of it will be on the top.
- Center - The object is centered between the top-aligned and bottom-aligned objects within the HMI symbol. Half of the extra space will be placed to the top of the object and the other half will be placed to the bottom when resizing the symbol.
- Bottom - The object is bottom-aligned to the bottommost part of the container (an HMI symbol or group). The object maintains its distance to the bottommost part of the container when resizing the symbol. All of the extra space will be placed to the top and none of it will be on the bottom.
- Stretch - The topmost point of the object is top-aligned to the topmost part of the container (an HMI symbol or group) and its bottommost point is bottom-aligned to the bottommost part of the symbol. This means, the object is anchored to both the top and to the bottom of the symbol.
- Proportional - The object and the space around the object within the HMI symbol definition are expanded in the same manner (for an example, see the 'Horizontal layout' description above).
Examples
The following example illustrates the four vertical layout options: 'Top', 'Center', 'Bottom', and 'Stretch'. The graphic shows the content of an HMI symbol definition in the default size (top image) and an instance of that symbol that has been lengthened (bottom image).
|
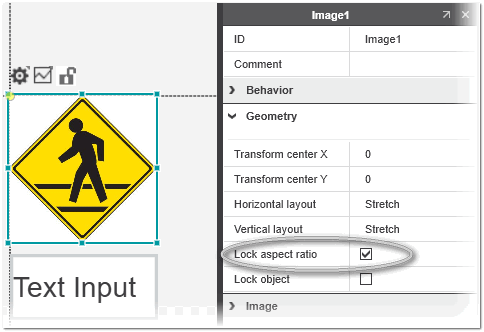
| Lock aspect ratio | When activated, the aspect ratio of the object (ratio between the width and the height of the object) is retained when resizing the HMI symbol instance. The object proportions are kept when resizing the symbol.
Example
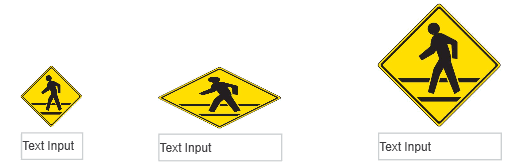
The following example shows an HMI symbol containing a text input box and a sign (which could be implemented as a symbol, an image, or a group). The checkbox 'Lock aspect ratio' is activated for the sign.
When the instance of the symbol is widened, the text input box retain the same height and the sign is expanded in the height, preserving its aspect ratio (the left image shows the HMI symbol definition in the default size, the middle image shows a widened instance of the symbol with deactivated 'Lock aspect ratio', and the right image shows a widened symbol instance with locked aspect ratio).
|
Layout properties examples
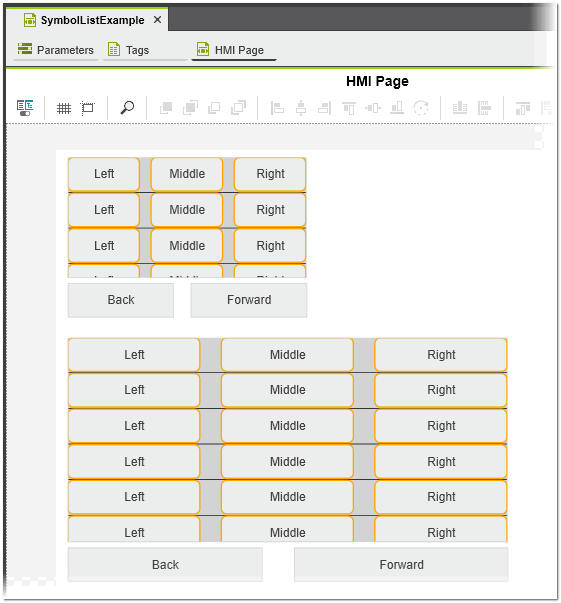
Symbol list with stretching in horizontal and vertical directions
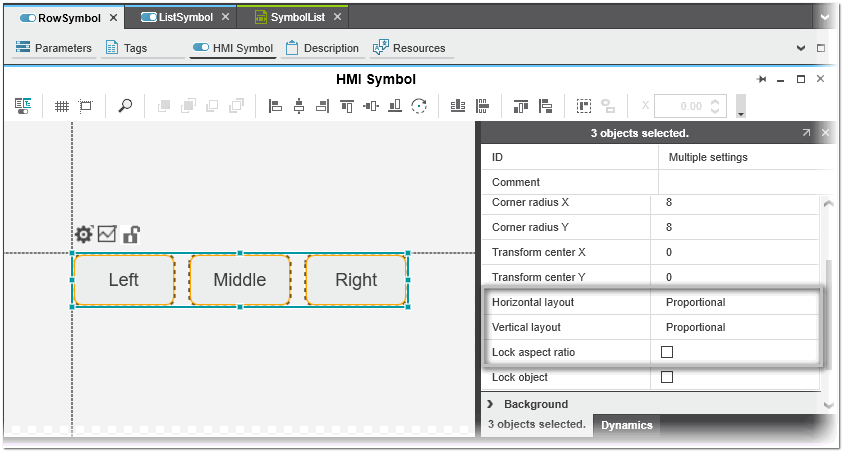
In this example, the 'RowSymbol' is used as symbol instance for the symbol list added to the 'ListSymbol' symbol definition. The 'RowSymbol' contains three buttons
with the following 'Geometry' properties:
- 'Horizontal layout': 'Proportional'
- 'Vertical layout': 'Proportional'
- 'Lock aspect ratio': no
'RowSymbol' properties
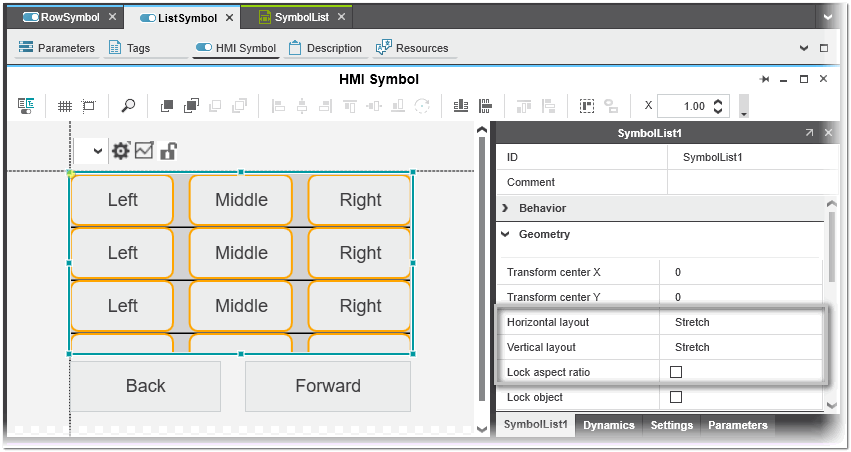
The 'ListSymbol' contains a symbol list with instantiated 'RowSymbol' and two buttons aligned to the bottom of the symbol definition. The symbol list has the following 'Geometry' properties:
- 'Horizontal layout': 'Stretch'
- 'Vertical layout': 'Stretch'
- 'Lock aspect ratio': no
Symbol list properties
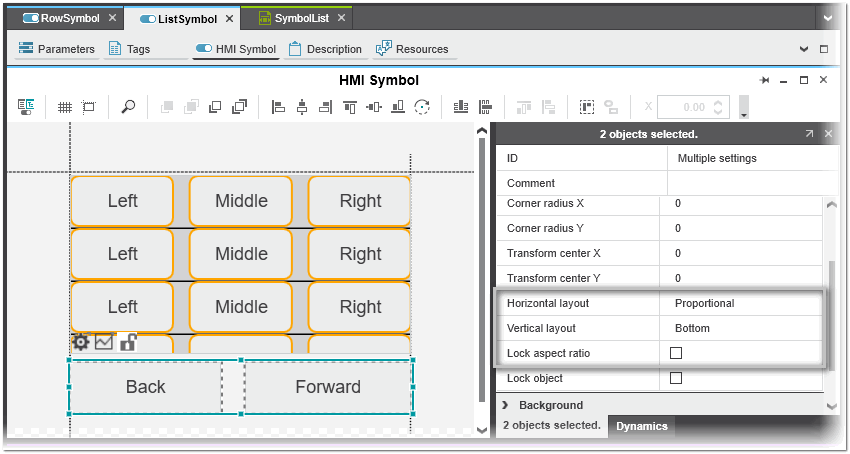
The buttons have the following 'Geometry' properties:
- 'Horizontal layout': 'Proportional'
- 'Vertical layout': 'Bottom'
- 'Lock aspect ratio': no
Button properties
When you add an instance of the 'ListSymbol' to an HMI page and expand the instance on the page (as shown in the following figure), the buttons are expanding intelligently, i.e., they retain their heights, font sizes, line widths, etc. New table rows are added in the symbol instance when it is expanded vertically. All of the space available in the symbol instance is used. (The following graphic shows the content of the symbol definition in the default size (top image) and an instance of that symbol that has been expanded (bottom image).)