Insert FUs/FBs into the code worksheet
You can insert a function or a function block- anywhere in the code worksheet and connect it later. For that purpose, left-click to select an empty cell. In NOLD/SNOLD specifics have to be considered (see section below).
- directly into an existing LD network and thus connect it on insertion with the three methods described below.
This topic contains the following sections:
- Specifics in NOLD/SNOLD
- Method 1: inserting a FU/FB by drag & drop from the COMPONENTS
- Method 2: inserting an FU/FB via keyboard
- Method 3: inserting an FB instance via drag & drop from the variables table
Specifics in NOLD/SNOLD
In NOLD and SNOLD, it depends on the position of the selected empty cell whether the newly inserted block creates a new code section or is inserted on the right side of the right power rail:
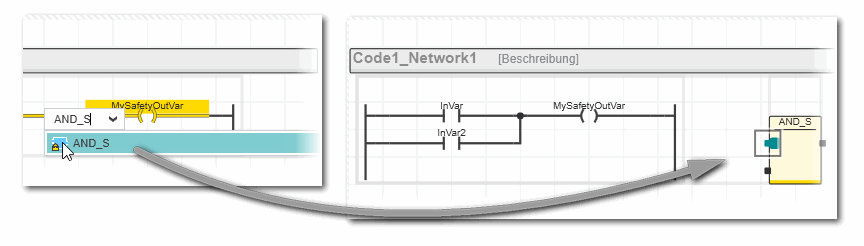
When inserting an element into a cell inside the frame of an existing network, it appears right of the right power rail. Example:
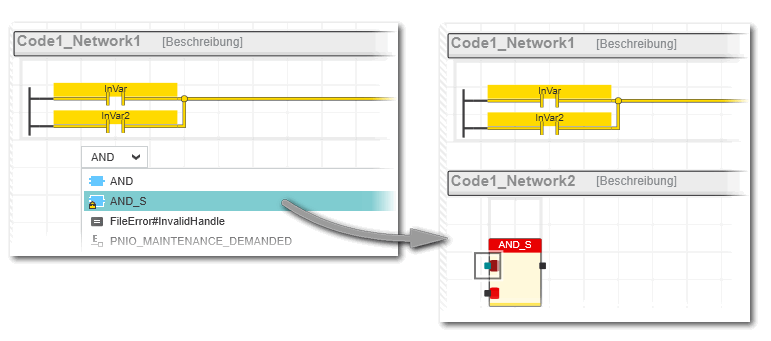
When inserting an element into a cell outside the frame of an existing network, a new code section is created. Example:
Method 1: inserting a FU/FB by drag & drop from the COMPONENTS
- In the COMPONENTS area, open the respective 'Functions and Function Blocks' folder and select the desired subfolder.
- Drag the function/function block into the code worksheet from the COMPONENTS area and drop it on the LD network where you want to place it. While dragging and dropping the object onto an existing LD network, the valid insertion positions for the object are indicated by colored markers (as shown in the following example). The connection line in the LD network is highlighted when the dragged object is permitted to be dropped.
 When dropping the block while an LD object is highlighted, the block will be inserted parallel to this LD object.
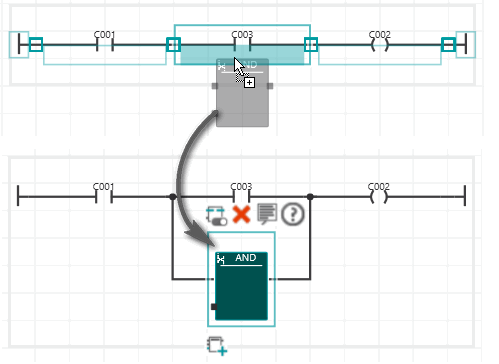 Even in NOLD and SNOLD, objects can be dropped unconnected. The following applies:
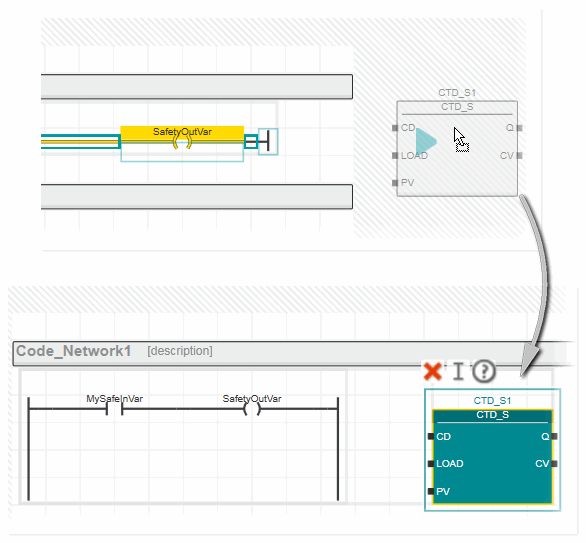
When pasting an object in a NOLD/SNOLD worksheet by dropping it, markings are shown while dragging the object. These markings indicate whether an object can be dropped (pasted) at the current mouse position and what will happen when dropping it:

Arrow icon is not filled: Insertion in direction of the arrow is not possible. 
Arrow icon is filled and points downwards: Insertion below the arrow is possible. The inserted object will create a new network. 
Arrow icon is filled and points to the right: Insertion on the right side of the arrow is possible. The object will be inserted right of the existing network and has to be connected manually in order to form a valid worksheet.  Example:
- If you have inserted a function block, declare the FB instance name in the variables table as follows:
- To accept and apply the instance name proposed by the programming system (shown at the top of the function block), right-click the function block and select 'Create New Function Block Instance' from the context menu or press <Ctrl>+<Shift>+<B>, or click the in-place toolbar button:

- To assign an already declared instance name or define a new name, double-click the function block and enter the instance name in the appearing input field. Alternatively, click the
 in-place button or press <F2> and enter the instance name.
- To accept and apply the instance name proposed by the programming system (shown at the top of the function block), right-click the function block and select 'Create New Function Block Instance' from the context menu or press <Ctrl>+<Shift>+<B>, or click the in-place toolbar button:
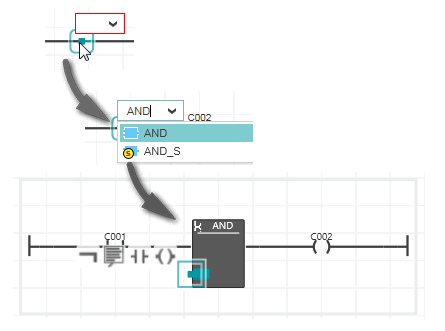
Method 2: inserting an FU/FB via keyboard
- Double-click the connection line to which the function/function block is to be connected.
- In the edit box, either type the name of the function/function block to be inserted or open the selection box and browse the drop-down list for the desired function/function block. Press <Enter> to confirm your selection.
- If you have inserted a function block, declare the FB instance name in the variables table as described above.
Method 3: inserting an FB instance via drag & drop from the variables table
Drag the function block instance from the variables table into the code worksheet and drop it on the LD network where you want to place it.
| Note
The page width for new NOLD and SNOLD worksheets can be set to a limited or unlimited width (defined by the number of contacts in a network rung) using the 'Fixed with..' option in the 'Graphic Editor | NOLD Options' category in the 'Extras > Options' dialog. If a limited page width is set, the network width is restricted to the right. The page width is determined by the defined number of contacts. An error is reported and the right power rail is highlighted accordingly when the set width is exceeded by inserting too many serial objects. In this case you have to delete objects to keep the defined width before editing can be continued. 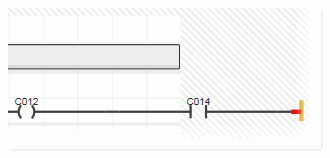 If the page width is set to unlimited ('Fixed with..' option is deactivated), the content of NOLD/SNOLD worksheets is treated and printed in the same way as in LD worksheets. |