Network Security: Certificates enable Secure Connection
PLCnext Technology controllers are equipped with a remoting certificate. When establishing a communication connection between the controller and PLCnext Engineer, the controller has to provide authentication to PLCnext Engineer by means of this certificate which exclusively belongs to this particular device. PLCnext Engineer then verifies the validity of this certificate.
This authentication allows the establishment of a secure channel (within one so-called security domain). The authentication is done automatically before the dialog for logging on to the controller appears (see topic "Network Security: Authentication with User Role and Password").
| Further Info
For details on certificates, refer to the topic "Security terms and background information". |
| Note
By securing the communication connection this way, also potential man in the middle attacks between PLCnext Engineer and the PLCnext Technology controller are recognized by the PLCnext Engineer. If such an attack is detected, you have the choice to stop the connection or to continue if the communication breach is intended and needed to support the chosen network architecture. |
The connection is only established if the certificate is valid. If the authentication fails, no secure communication connection can be established. To logon nevertheless, you can instruct PLCnext Engineer to establish an unsecured connection. Refer to section "Accepting a rejected controller certificate..." for details. Otherwise, logging on will not be possible.
Owner-specific certificate instead of Phoenix Contact certificate
In delivery state, a PLCnext Technology controller is equipped with a manufacturer-defined certificate issued by Phoenix Contact (in accordance with the IEEE 802.1AR standard).
This manufacturer-defined device certificate can be replaced in the controller by an owner-specific device certificate which can be configured and issued by the device owner (Certification Authority, see section "CA-signed certificates vs. self-signed certificates").
| Further Info
Refer to your controller manual for information whether the controller involved supports the use of own certificates and for the steps to be done for the replacement. The topic "Security Settings of the Controller (via WBM)" provides further information on the necessary steps for replacing the certificate in the controller. |
After implementing an owner-specific device certificate in the controller (or a hierarchical certification structure), PLCnext Engineer must be adapted accordingly as described below. You have to deposit the corresponding certificate for validating the customer-specific controller certificate in PLCnext Engineer.
| Note
If a hierarchical certification structure is implemented in your application, you must install all certificates of the certificate path on the controller. This includes the device certificate itself, all issuer certificates and the Trusted Anchor (root certificate). Refer to the section "Security terms and background information" for details. |
Adding, removing, enabling/disabling controller certificates in PLCnext Engineer
| Note
Adding, deleting and enabling/disabling controller certificates is only possible after launching PLCnext Engineer with Windows administrator rights and while no project is open. |
To recognize a controller certificate installed on the device as valid, PLCnext Engineer has to know the corresponding certificate. For that purpose, it has to be added to PLCnext Engineer.
| Note
If you have implemented a hierarchical certification structure in your application, at least the Trusted Anchor (root certificate) of the certificate path must be available in PLCnext Engineer. Based on the Trusted Anchor, PLCnext Engineer is able to validate the entire certification path including all Issuer Certificates. Refer to the section "Security terms and background information" for details. Installing only the Trusted Anchor (but not the Issuer Certificates of the path) avoids unnecessary subsequent installations in PLCnext Engineer when modifying the certification hierarchy of the device certificate (for example, by inserting or replacing any Issuer Certificate (signed by a sub-CA). |
The following operations are to be done in the 'Options' dialog. In PLCnext Engineer, select 'Extras > Options' and select the category 'Administration > Trust Stores'.
- To add a controller certificate, select the 'Device Communication' header on the right. Click the 'Add' button, browse for the desired certificate file, select one or several files and click 'Open'. For each added certificate, the issuer (creator), serial number and subject (owner) is displayed.After adding a controller certificate, it is automatically enabled for use, i.e., the checkbox at the beginning of the table row is marked.
- To remove one or several controller certificates, select the desired row in the certificate list and click 'Remove'.Removing a certificate from PLCnext Engineer does not delete the certificate file from your PC.
- Each controller certificate in the list provides a leading checkbox. This checkbox enables or disables the certificate. PLCnext Engineer only uses certificates with a marked checkbox.
Accepting a rejected controller certificate in PLCnext Engineer (unverified certificate)
When you have installed an owner-issued certificate in the controller without adapting PLCnext Engineer as described above, the verification against the Phoenix Contact Trusted Anchor (root certificate) fails and the manufacturer certificate issued by Phoenix Contact is no longer trusted. A secure communication connection to the controller cannot be established.
In this case, a warning dialog appears in PLCnext Engineer when trying to connect to the respective controller.
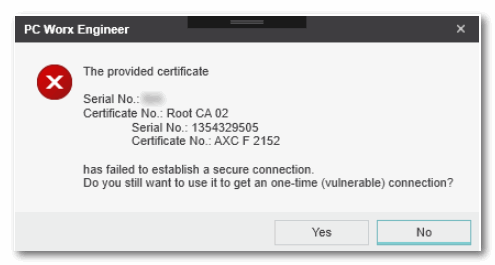
Clicking 'Yes' in this dialog instructs PLCnext Engineer to establish the communication connection nonetheless with the rejected certificate. The logon dialog appears where you can enter a user role and the relating password.
The shield icon in the PLANT indicates the accepted "unsecured" connection by the following icon:
| Note
This acceptance is only valid for the current session/connection (one-time acceptance). After disconnecting and reconnecting to the same device, the acceptance dialog will appear again. |