Project Comparer Workspace
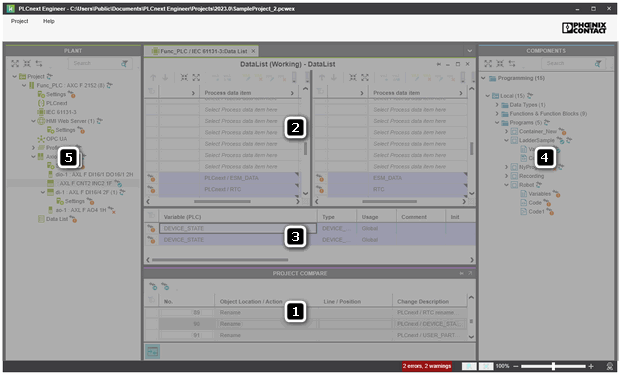
The Project Comparer workspace opens automatically after starting the comparison via a 'Project > Compare ...' command. The workspace is divided into the following sections:
| Note
The Project Comparer workspace is read-only. In project compare mode, you cannot edit the project. |
PROJECT COMPARE window
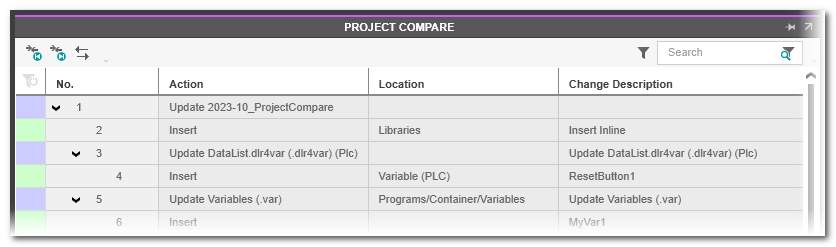
The PROJECT COMPARE window displays the comparison results. The grid shows all the differences in a tree structure. The differences are grouped by the action (such as Update, Delete, etc.).
The colors in the first column indicate the type of the found difference. The color always relate to the currently loaded project (not the comparison project).
| Color | Meaning |
|---|---|
 | Element modified (updated) |
 | Element added (inserted) |
 | Element deleted |
 | Element moved or alignment edited |
The toolbar contains the following buttons:
 | Stepping through the list (next or previous found difference) |
 | Synchronizing the difference currently selected in the open editor with the corresponding list entry |
At the bottom of the screen, a button is available for hiding the window: 
You can expand or collapse groups by clicking the arrow icon in the 'No.' column. The comparison results grid provides the following information (columns):
- 'Action' - Shows what has been done.
- 'Location' - Shows where the difference has been detected.
- 'Change Description' - Short description of the change.
Double-clicking an entry in the window opens the comparative view showing the differences side by side in the comparative view (see next section). When double-clicking an expandable group heading, all differences contained as child elements are marked in the comparative view.
When hovering an entry in the PROJECT COMPARE window, the relating difference is highlighted in the corresponding tree editor.

 Filtering the differences list in the PROJECT COMPARE window


Comparative view and detail view
Comparative view
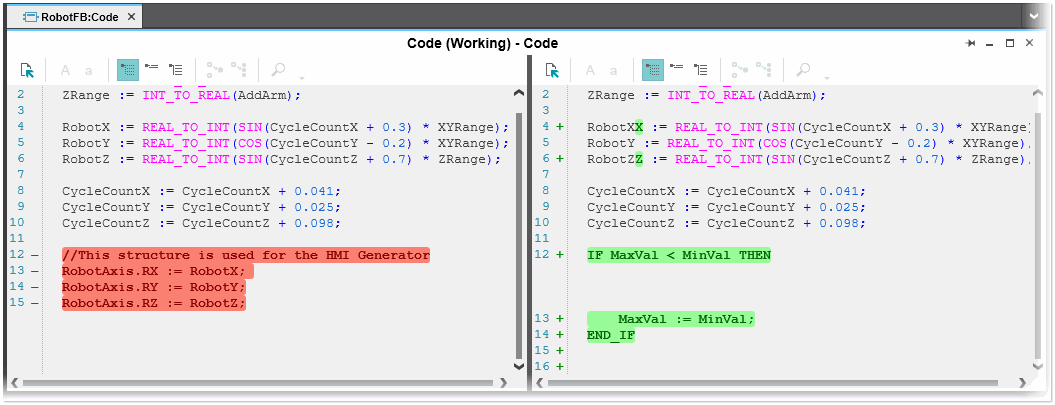
The comparative view displays differences in (code) worksheets, grid content (variables tables, Data/GDS Port Lists) or content in other editors of both projects side by side in read-only mode. The view is opened by double-clicking an entry in the PROJECT COMPARE window or a modified node in the COMPONENTS or PLANT area.
| If the focus to the differences list is lost when clicking in the comparative view, you can use this icon in the 'Project Compare' window toolbar to synchronize the comparative view with the list again. |
| Note
The comparative view only shows one editor (side by side). If you select another difference in the PROJECT COMPARE window, the current editor will be closed and a new editor will be opened. |
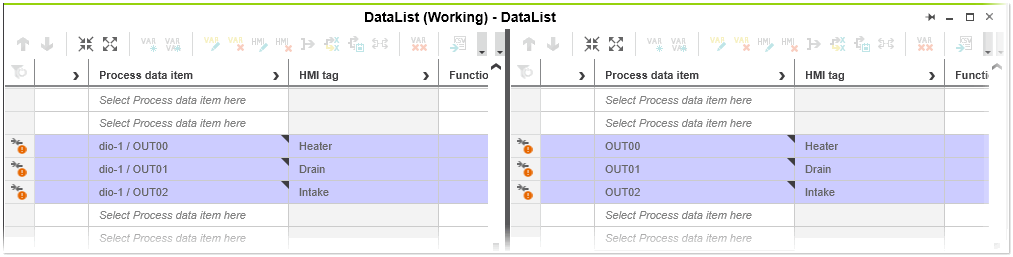
The working project (project which is currently loaded in PLCnext Engineer) is displayed on the left side. The content of the project compared with the actual project (the project you have selected via dialog or the online project) is shown right.
In the comparative view, the following applies:
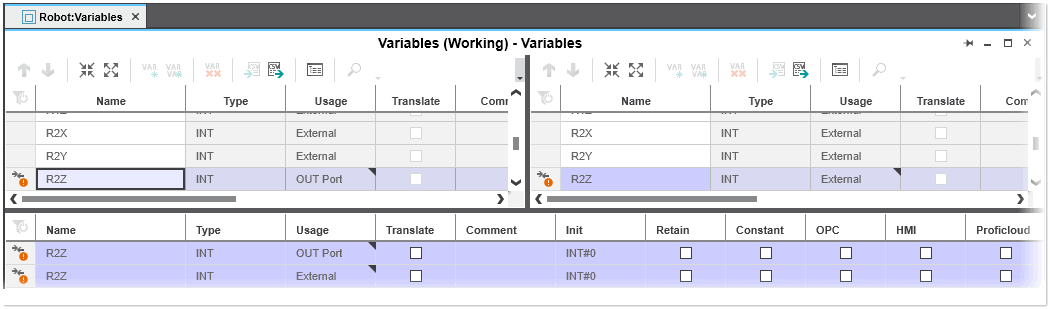
- Differences in table-based editors (variables tables, Data Lists, GDS Port Lists) and the 'Settings' or 'Parameters' editors are identified in the first column by an icon indicating the modification type (see the example above). Left-clicking a difference in one of these editors opens the detail view (see below). Differing code-relevant objects/grid lines (including comments) are additionally shown with a specific color (see below for an overview of the icons and colors used).
- Changed values (properties) within an updated row of a table-based editor (for example, in a variables declaration) are additionally highlighted with a triangle icon at the top right in the corresponding table cell.

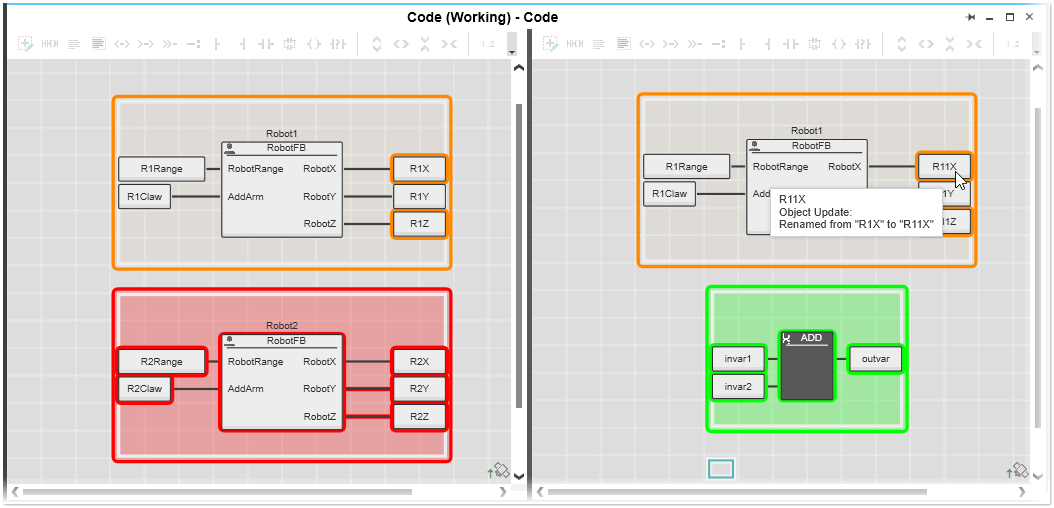
- Display of differences in the graphical editor: Differences of objects and connections are marked with the following colors. The tooltip of a modified object provides information on the change (see the example below). - Red: Object deleted (left-side only)- Green: Object added (right-side only)- Orange: Changed (both sides)- Blue: Execution order of network changed
- Display of differences in the ST code editor and Data Types editor: Add, modify, and delete differences are marked with the following colors and characters in the code line (see the example below). - Red: deleted (left-side only). Code line with preceding minus character.- Green: added/modified (right-side only). Code line with preceding plus character.
Detail view
Left-clicking a difference in any table-based editor in the comparative view opens the detail view. The view displays the elements from both project versions allocated on top of each other. The differences are shown with the same symbols and colors as used in the comparative view.
Changed values (properties) within an updated table row (for example, in a variables declaration) are additionally highlighted with a triangle icon at the top right in the corresponding table cell.
Comparison icons and colors in comparative / detail view
The following table shows an overview of the icons and colors used in the comparative view and detail view to highlight the differences.
| Icons (left | right side) | Row colors (left | right side) | Meaning |
|---|---|---|
 / / |  | | | Element modified (updated) |
 / / |  | | | Element added (inserted) |
 / / |  | | | Element deleted |
| / | | | Element moved or alignment edited |
COMPONENTS area
In the COMPONENTS area, the nodes for which differences have been found, are marked by specific icons indicating the modification type (see below for a description of the icons used). If at least one subordinate element of a folder node differs, the modified icon ( ) is shown next to the parent node (see the 'Programs' folder in the following example).
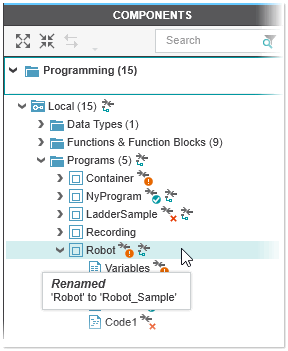
For information about the changes for a node, hover your mouse cursor over the node.
To view the details about the changes for a modified element in the comparative view, double-click the corresponding node.
PLANT area
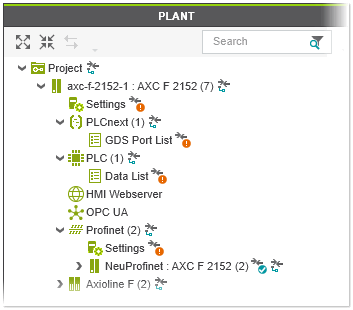
In the PLANT area, icons attached to the nodes indicate the modification type (see below for a description of the icons used). If at least one subordinate element of a node differs, the modified icon () is shown next to the node. If changes are made to elements in a 'Settings' editor, Data List or GDS Port List, the changes are shown in a separate node in the PLANT tree as shown in the following example (the 'Settings', Data List or Port List nodes are only visible if there are changes in any list).
To view the details about the changes in any editor ('Settings' or 'Parameters') or the Data Lists or Port Lists, double-click the corresponding node. The changes are displayed in the comparative view side by side.
Comparison icons in COMPONENTS and PLANT area
The following table shows an overview of the icons used in the COMPONENTS area and PLANT area to highlight the differences.
| Icon | Meaning |
|---|---|
 | Element or at least one subordinate element differs |
 | Element modified |
 | Element added |
 | Element or at least one subordinate element deleted |