Editing LD Networks
This topic contains the following sections:
General information on networks (LD mixed with FBD)
A graphic code worksheet consists of one or more networks. Each network contains a combination of FBD/LD code objects that are linked via connection lines. The order of execution of the networks within a code worksheet normally runs from top to bottom.
In PLCnext Engineer, three variants of mixed FBD and LD code worksheets are available.
-
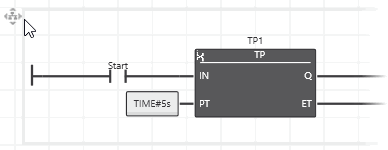
FBD/LD code worksheets, programmed with the free graphic editor. This editor allows a user-defined code layout with a high level of design-freedom. You can insert, delete, connect and disconnect single objects and move them in the worksheet while the editor performs auto-routing of connection lines. Refer to the topic "Select, Move, Copy/Cut/Paste Objects" for details on such editing operations.Hovering the mouse over a network displays a network-surrounding gray border as shown in the following FBD/LD network. When positioning the mouse cursor in the upper left corner within that network border, the 'Move' icon appears. By clicking the 'Move' icon and holding the mouse button down, the entire network can be moved.
-
NOLD (Network Oriented Ladder) code worksheets, programmed with the network-oriented graphic editor. The NOLD editor prescribes the code layout. This means, the network layout is arranged automatically and cannot be modified by the user. For example, objects and lines cannot be moved.In NOLD, each code network is considered as section which is bordered at the top by a horizontal bar. A section/network is characterized by a continuous left and right power rail. It is not possible to insert a further network within one section. Instead, a new section is generated.
 The network label in the horizontal section bar identifies the network and can be used as jump label. Jumps to a section are possible from other networks within the same worksheet.
-
SNOLD (Safety Network Oriented Ladder) code worksheets, programmed with the network-oriented and safety-related graphic editor. Basically, the SNOLD editor works like the NOLD editor but it provides additional safety-related features (continuous verification of the worksheet data consistency, safety-related signal path analysis, etc.). Refer to section "Similarities and differences between FBD/LD, NOLD and SNOLD" for details.
NOLD/SNOLD and FBD/LD use the same syntax and objects.
Functional language range in SNOLD: LVL or FVL:
Compared to the functional range of standard FBD/LD, some restrictions apply in SNOLD regarding the available language objects. Which restrictions these are depends on your application and the applicable safety requirements. Depending on the applicable safety regulations and standards, PLCnext Engineer supports a Limited Variability Language (LVL) or a Full Variability Language (FVL). FVL comprises more language objects and possibilities as LVL. Jumps, for example, are only available in an FVL.
To specify the available language elements (LVL or FVL) and set the applicable standard this way, select the 'Project > Change Language Profile' menu item and select the desired profile in the appearing selection dialog. You have to be logged on to the Safety-related Area for this purpose.
What do you want to do?
 Insert a basic network
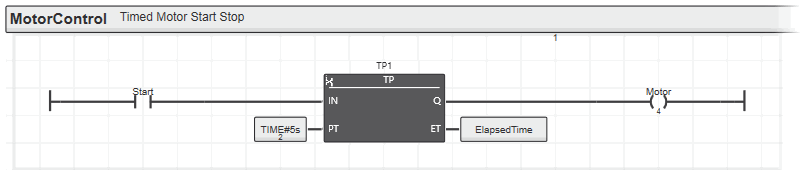
When developing an LD network, first a basic network consisting of one contact, one coil and two power rails must be inserted. Then, this basic network can be expanded by further parallel/serial contacts/coils or other graphical objects such as functions and function blocks.
FBD/LD code worksheets:
- Left-click into the code worksheet at the position where you want to place the network.
- Left-click the
 in-place button or the corresponding button on the editor's toolbar. Alternatively, press <F8>.A basic network with a left and right power rail and a contact and coil is inserted. Although the LD objects have identifiers (C001 and C002), no relating variables are yet declared.
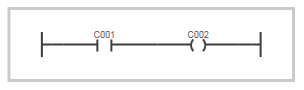
- Insert/declare variables for the contact and coil as described in the procedure "Assign variables/constants to an LD object" (see below).
NOLD and SNOLD code worksheets:
In
NOLD and SNOLD, an entire code section is inserted with a new network, bordered by the horizontal section bar at its top.
- Left-click anywhere below the lowest existing section.
- Left-click the in-place button or the corresponding button on the editor's toolbar. Alternatively, press <F8>.A basic network with a left and right power rail and a contact and coil is inserted. Although the LD objects have identifiers (C001 and C002), no relating variables are yet declared.
- Insert/declare variables for the contact and coil as described in the procedure "Assign variables/constants to an LD object" (see below).
Insert serial or parallel contacts/coils
The following buttons and keyboard shortcuts are available to insert serial or parallel contact/coils into an existing LD network in FBD/LD, NOLD, SNOLD and SFC code.
| Toolbar / in-place button | Keyboard shortcut | Description |
 | <Ctrl>+<F8> | Inserts a serial contact to the right of the selected object.An unconnected contact is inserted by left-clicking at a free position in the worksheet and then executing the command.Observe the note below the table. |
 | <Alt>+<F8> | Inserts a serial coil to the right of the selected object.An unconnected coil is inserted by left-clicking at a free position in the worksheet and then executing the command.Observe the note below the table. |
 | <Shift>+<F8> | Inserts a parallel object below the selected object. If a contact is selected, a new contact is inserted. With a selected coil, a new coil is inserted.
Observe the note below the table. |
Note
In NOLD and SNOLD, these icons are only available if a suitable object or line in an existing network is selected. "Suitable" means that the new contact is allowed to be inserted at this position. |
Note
The page width for new NOLD and SNOLD worksheets can be set to a limited or unlimited width (defined by the number of contacts in a network rung) using the 'Fixed with..' option in the 'Graphic Editor | NOLD Options' category in the 'Extras > Options' dialog.
If a limited page width is set, the network width is restricted to the right. The page width is determined by the defined number of contacts.
An error is reported and the right power rail is highlighted accordingly when the set width is exceeded by inserting too many serial objects. In this case you have to delete objects to keep the defined width before editing can be continued.

If the page width is set to unlimited ('Fixed with..' option is deactivated), the content of NOLD/SNOLD worksheets is treated and printed in the same way as in LD worksheets. |
Insert power rails
 | In FBD/LD and SFC code, power rails can only be inserted directly connected to objects.
The editor recognizes whether a left or right power rail is allowed at the marked object. The corresponding toolbar button is inactive if the power rail is not possible at the selected network position.In NOLD and SNOLD, only entire networks can be inserted and deleted. |
Assign variables/constants to an LD object
Each LD object must have a valid variable or constant assigned. In LD, the object name corresponds to the name of the variable/type of constant assigned to the object. On insertion of a contact or coil, a default name is assigned. As this new object is not yet declared in the local variables table or any Data List, the object is highlighted in the code worksheet and a corresponding error is reported.
A variable can be assigned to an LD object using the following methods.
Method 1: selecting a variable that is already declared in the local variables table
- Double-click the LD object in the code worksheet.
- In the appearing selection box, browse for the variable to be inserted (type the first character(s) of the variable to facilitate your search), select the variable and press <Enter>.
Method 2: assigning a variable by drag & drop
Drag the variable from the local variables table into the code worksheet and drop it on the desired LD object.
If an input variable is dragged from the variables table and directly dropped on an LD network rung (not on an object), it will be added as contact.
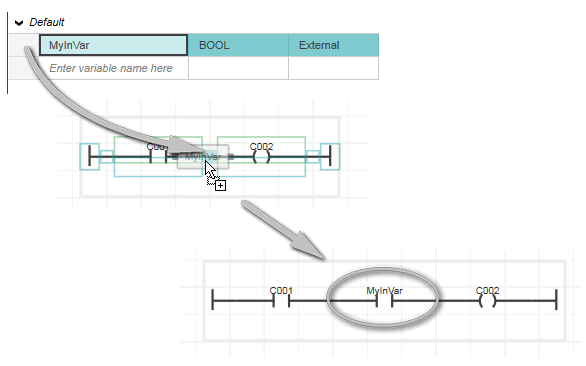
If an output variable is dragged and dropped on the LD network rung, a coil will be inserted.
Method 3: declaring a new variable for an LD object
- Double-click the LD object, enter the name of the new variable in the appearing selection box and press <Enter>.
- Right-click on the variable and select 'Create New Variable > Variable type' from the context menu, or left-click the variable and select the appropriate in-place button:See also topic "Variable Declaration Keywords" for details.
- If required, set the variable properties (data type, initial value, various flags, etc.) in the variables table.
Insert functions/function blocks
You can insert a function or a function block anywhere in the code worksheet and connect it later. For that purpose, left-click to select an empty cell.
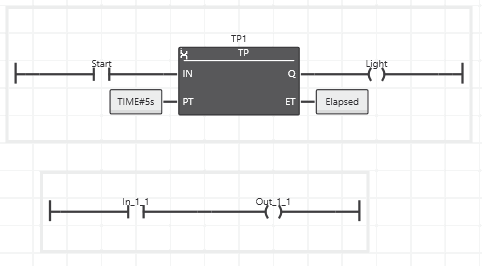
In NOLD and SNOLD, it depends on the position of the selected empty cell whether the newly inserted block creates a new code section or is inserted on the right side of the right power rail:
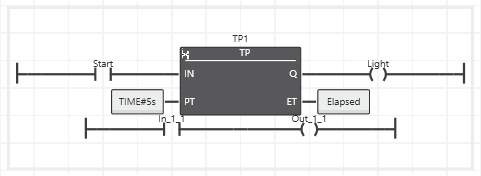
When inserting an element into a cell inside the frame of an existing network, it appears right of the right power rail. Example:

When inserting an element into a cell outside the frame of an existing network, a new code section is created. Example:

You can directly insert a function or a function block into an existing LD network and thus connect it on insertion with the following methods.
Method 1: inserting a function/function block by drag & drop from the COMPONENTS area
- In the COMPONENTS area, open the respective 'Functions and Function Blocks' folder and select the desired subfolder.
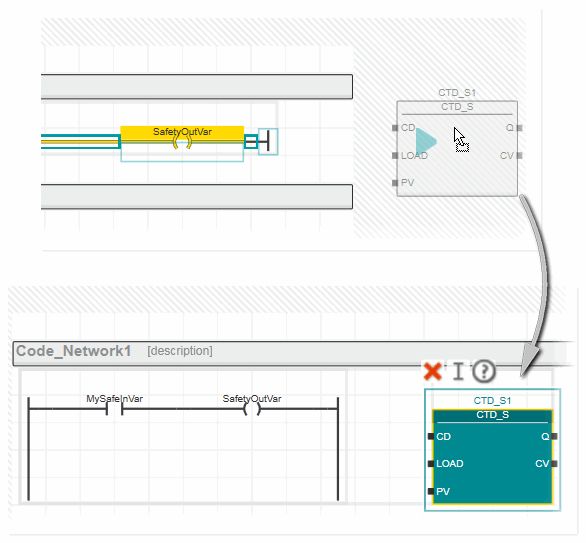
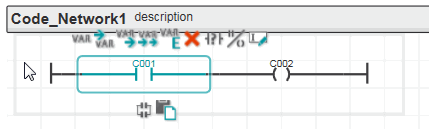
- Drag the function/function block into the code worksheet from the COMPONENTS area and drop it on the LD network where you want to place it. While dragging and dropping the object onto an existing LD network, the valid insertion positions for the object are indicated by colored markers (as shown in the following example). The connection line in the LD network is highlighted when the dragged object is permitted to be dropped.
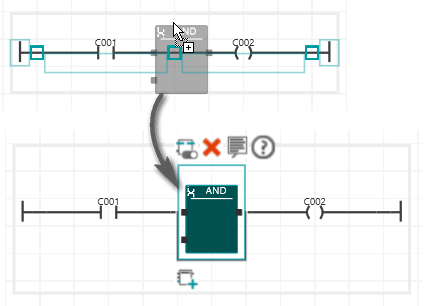 When dropping the block while an LD object is highlighted, the block will be inserted parallel to this LD object.
 Even in NOLD and SNOLD, objects can be dropped unconnected. The following applies:
When pasting an object in a NOLD/SNOLD worksheet by dropping it, markings are shown while dragging the object. These markings indicate whether an object can be dropped (pasted) at the current mouse position and what will happen when dropping it:
- If you have inserted a function block, declare the FB instance name in the variables table as follows:
- To accept and apply the instance name proposed by the programming system (shown at the top of the function block), right-click the function block and select 'Create New Function Block Instance' from the context menu or press <Ctrl>+<Shift>+<B>, or click the in-place toolbar button:

- To assign an already declared instance name or define a new name, double-click the function block and enter the instance name in the appearing input field. Alternatively, click the
 in-place button or press <F2> and enter the instance name.
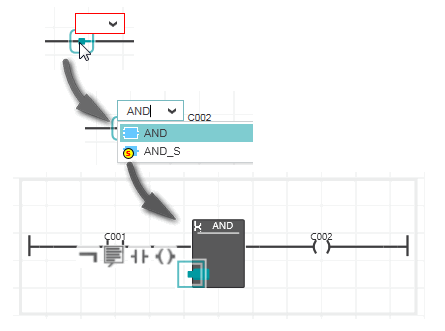
Method 2: inserting a function/function block via keyboard
- Double-click the connection line to which the function/function block is to be connected.
- In the edit box, either type the name of the function/function block to be inserted or open the selection box and browse the drop-down list for the desired function/function block. Press <Enter> to confirm your selection.
- If you have inserted a function block, declare the FB instance name in the variables table as described above.
Method 3: inserting a function block instance via drag & drop from the variables table
Drag the function block instance from the variables table into the code worksheet and drop it on the LD network where you want to place it.
Note
The page width for new NOLD and SNOLD worksheets can be set to a limited or unlimited width (defined by the number of contacts in a network rung) using the 'Fixed with..' option in the 'Graphic Editor | NOLD Options' category in the 'Extras > Options' dialog.
If a limited page width is set, the network width is restricted to the right. The page width is determined by the defined number of contacts.
An error is reported and the right power rail is highlighted accordingly when the set width is exceeded by inserting too many serial objects. In this case you have to delete objects to keep the defined width before editing can be continued.
If the page width is set to unlimited ('Fixed with..' option is deactivated), the content of NOLD/SNOLD worksheets is treated and printed in the same way as in LD worksheets. |
Open the editor group of a function/function block
To open the editor group of a function/function block POU, double-click the function/function block in the LD network. Alternatively, right-click the function/function block and select 'Go to Implementation' from the context menu.
Change the contact/coil type
 | Contacts and coils are available as different types (for example, a normally closed or a normally opened contact). To iterate through the available object types, select the contact/coil and left-click the 'Iterate' in-place button or toolbar button repeatedly until the desired type is shown. Alternatively, press <Alt>+<F7>. |
Toggle between contact and coil
 | To replace a selected contact with a coil or vice versa, select the contact or coil and click the 'Toggle' in-place button (the assigned variable remains unchanged). |
Create/handle friendly networks (only in FBD/LD code)
In FBD/LD code worksheets, networks can be friendly to another network. Friendly means, the networks can overlap each other whereby each network is still separately run through when it is part of a friendly network. A friendly network is shown on a different background when hovering the mouse pointer over the network.
Example of a default network arrangement and a friendly network: the left figure shows the code worksheet with the default arrangement of two networks. In the figure on the right the two networks form a friendly network.
You can create a friendly network by
- moving a network inside another network by dragging the network using the 'Move' icon while holding down the <Alt> key.
- connecting two or more objects within a network.
- deleting a connection so that one network is divided in two which overlap each other
A friendly network is solved by moving overlapping objects of one network outside the other network or by connecting the two networks via connection lines to form a single network.
Expand/collapse NOLD/SNOLD code sections
You can expand or collapse a single code section or all code sections simultaneously in the active worksheet.
- To collapse a single code section, left-click the down arrow to the left of the horizontal bar.
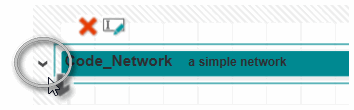 To expand a collapsed section, left-click the right arrow to the left of the horizontal bar.
- To expand all code sections in the worksheet, click the
 button on the editor's toolbar.To collapse all the expanded code sections, click the
  button on the toolbar.
Rename a NOLD/SNOLD code section (network)
Each code network in NOLD and SNOLD is considered as section which is bordered at the top by a horizontal bar. Within the horizontal section bar, a network label is defined which identifies the network. In NOLD, the network label is used as jump label.
In SNOLD, jumps to network labels are only supported with the FVL language profile.
Background information
Functional language range in SNOLD: LVL or FVL:
Compared to the functional range of standard FBD/LD, some restrictions apply in SNOLD regarding the available language objects. Which restrictions these are depends on your application and the applicable safety requirements. Depending on the applicable safety regulations and standards, PLCnext Engineer supports a Limited Variability Language (LVL) or a Full Variability Language (FVL). FVL comprises more language objects and possibilities as LVL. Jumps, for example, are only available in an FVL.
To specify the available language elements (LVL or FVL) and set the applicable standard this way, select the 'Project > Change Language Profile' menu item and select the desired profile in the appearing selection dialog. You have to be logged on to the Safety-related Area for this purpose.
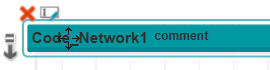
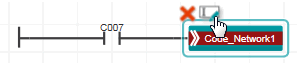
A newly inserted code section gets the default name Code_Networkn where n is a consecutive number.

If a POU consists of several code worksheets, Codex_Networkn is used as default network label, where x specifies the code worksheet number in the POU.
To edit the network label, first left-click the section bar and then click the  in-place button. The 'Edit Object' command is also available in the context menu.
Note
The network label is used as jump label in NOLD. If you modify a network label, you have to edit the related jumps accordingly. Affected jumps are marked red in the code. Example:
 |
The section bar also includes an optional comment. It can be edited in the same way as the network label via the context menu or the in-place toolbar button.
Set verification mark for SNOLD code section