Extended Debugging: Execution Values/Indication vs. "Normal" Online Values
This topic contains the following sections:
- Switching an online worksheet to Execution Value/Execution Indication mode
- Execution Indication Signs
By default, online code worksheets show the variable values stored in the I/O image between controller working cycles. Value changes that occur during a working cycle are not visible in online worksheets.
Instead of this default online mode, you can switch individual online code worksheets to the Execution Value mode. In this mode, the actual variable value at the code position at the time of processing is displayed in the online worksheet.
| Note
The display of execution values and execution indication requires additional code that must be generated by the compiler. Therefore,
|
|
WARNING
|
Unintended machine operation
|
Switching an online worksheet to Execution Value/Execution Indication mode
- Open the Cockpit.
- If the buttons for selecting the extended debug modes is inactive in the Cockpit, disconnect the controller to enable the buttons.
- Switching the individual worksheets to Execution Value/Execution Indication mode (step 4) is only possible if the respective option is selected in the Cockpit prior to building and writing the project.To enable the Execution Value/Execution Indication mode, click one of the following toolbar button on the right:
 'Execution Value'
  'Execution Value and Execution Indication' (only possible in combination with the option 'Execution Values').The dialog 'Debug Code Settings' appears.You can combine the display of execution values with the debugging of user function POUs by activating the button 'Debug Functions' at the same time in the Cockpit. Execution values are then even displayed in user functions after switching the corresponding function worksheet to Execution Value mode:/
 +
+
- In the dialog, select the POUs for which you want to see execution values.
Note
In order to keep processor load and memory consumption as low as possible, mark only those POUs that are really required. - 'Write and start' the project as described here.
- Open the required worksheet instance as described here.
- In the online worksheet (text or graphic), choose 'Toggle Execution Value Mode' from the worksheet's context menu or click the 'Execution Value mode' icon on the editor's toolbar:
 The online worksheet now shows execution values read from the code position at the time of processing instead of online values from the I/O buffer (read between two cycles). (See the description below how the execution values are indicated in online worksheets.)Execution indications signs are only visible if the corresponding button is also activated in the Cockpit.
To terminate the mode for this particular worksheet, click the toolbar icon again. To disable the Execution Value/Execution Indication mode in general, deselect the pressed toolbar buttons in the Cockpit and write the project to the controller again.
| Note
Deactivate this extended debugging feature for normal operation, i.e., after debugging. |
Execution Indication Signs
In the graphic and text editor, the execution values are represented by the following symbols:
| Symbol | Examples | Meaning |
|---|---|---|
| Vertical bar preceding the variable | Display in ST: Display in FBD/LD:
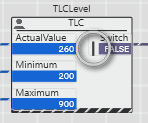 | The variable has been updated once in the last cycle. |
| Double vertical bar preceding the variable | Display in ST: Display in FBD/LD:
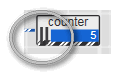 | The variable has been updated at least twice or more in the last cycle, for example, in a loop. |
| Solid line | Display in FBD/LD: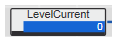
 | The object has not been processed in the last cycle. |
| Single-dash line | Display in FBD/LD:
 | The object has been processed once in the last cycle. |
| Double-dash line | Display in FBD/LD: | The object has been processed at least two or more times in the last cycle. |
| Note
If an object is shown without any of the described symbols, no execution value is available as shown in the following example for Robot1 FB. 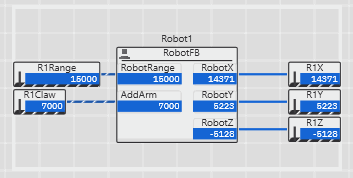 |