Constants, Jumps/Labels, Returns, Connectors
In graphical code worksheets, common objects are provided to develop your application logic. They can be used in FBD/LD, NOLD and SFC code worksheets. Some of these objects are also available in SNOLD, i.e., in safety-related code. The objects can be inserted into the code worksheet either via toolbar button, context menu command or keyboard (Intellisense function).
This topic contains descriptions of the following objects:Constant (Literal)
Insert a constant (literal) as follows:
- To insert and connect a constant to an object directly, double-click the object in the code worksheet and type the constant according to the notation given in the IEC 61131-3 standard.
- To insert a constant at a free position in the worksheet, click into an empty cell, type the constant value and press <Enter> to confirm.
In NOLD and SNOLD, it depends on the position, whether the insertion into an empty cell creates a new code section or the object is inserted on the right side of the right power rail. See procedures below for details.
To edit a constant, double-click it, edit the value and press <Enter> to confirm. Alternatively, press <F2> or click the  in-place button or and edit the name.
Double-clicking a TIME constant opens the time selection box. From left to right, the 5 text fields represent the days, hours, minutes, seconds and milliseconds.
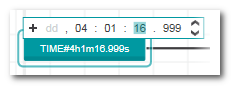
To set the value, left-click the digit you want to change and enter the desired value or use the arrow icons to set the corresponding value. Then press <Enter> to confirm.
| Note
You can also declare constant variables by activating the 'CONSTANT' attribute in the declaration. Refer to topic "Variables/Port Properties" for details. |
Jump and Jump Label (no labels in NOLD and SNOLD)
 | A jump object and the associated label object can be used to skip over a section of the code network. If the jump condition becomes TRUE, the code objects between the jump and the related label are not processed and program execution is continued at the label position.
|
In SNOLD, jumps to network labels are only supported with the FVL language profile.
 Background information
A valid jump must consist of the jump object (source) and one associated label object (target), both with the same name. Within the same code worksheet, several jump objects with the same name targeting to only one label are permitted. Jump objects can only be connected to object outputs.
Insert a jump object
In FBD/LD and NOLD: To insert and connect a jump object to an object on insertion, proceed as follows:- Select a function/function block output or a coil and click the 'Insert Jump' button on the editor toolbar:

- Double-click into the jump object and select a label from the drop-down list. Alternatively, press <F2> or click the
 in-place button or and edit the name.
To insert a jump at a free position in the worksheet, click into an empty cell, click the button and confirm with <Enter>.
In NOLD, it depends on the position, whether the insertion into an empty cell creates a new code section or the object is inserted on the right side of the right power rail. See procedures below for details.
Insert a label object
- In FBD/LD: To insert a label object, click into the desired empty cell where the code processing is to be continued and then click the 'Insert Label' toolbar button.

- To edit the object name, double-click it and enter the name or select the name of an existing jump from the selection list. Alternatively, click the 'Edit' in-place button of the object and enter or select the name.
In NOLD, no user-defined labels can be inserted. Instead, the network label can be used as jump label.
Return (not supported in SNOLD)
 | A return object can be inserted for returning back to the calling POU if the Boolean variable is TRUE. If the variable is FALSE, the execution of the current POU continues. |
| Note
Returns are not supported in safety-related code (SNOLD). |
- To insert a return into a network and connect it on insertion, select a coil and click the 'Insert Return' button on the editor toolbar:

- To insert an unconnected return at a free position in the worksheet, click into the desired empty cell (where to return to the calling POU) and then click the 'Insert Return' toolbar button shown above.
In NOLD and SNOLD, it depends on the position, whether the insertion into an empty cell creates a new code section or the object is inserted on the right side of the right power rail. See procedures below for details.
Connector (in FBD/LD code, not supported in NOLD, SNOLD and SFC)
 | Connectors can be used to improve the layout of the element's structure in the code worksheet. Connectors simply replace connection lines in the worksheet. When executing the program it goes automatically from the output connector to the input connector with the same name.Additionally, auto-connectors can be inserted by the graphic editor, if auto-routing is not possible. See topic "Toggling Line vs. Connector Display" for details. |
Rules for connectors
- Connectors are restricted to the free graphic editor and are not available in the network-oriented editor.
- Connectors are not supported in SFC.
- Connectors are not supported in safety-related code (SNOLD).
- Connectors can be connected to inputs and outputs of an object.
- Connectors are only valid within the same code worksheet.
- Several input connectors (source) with the same name but only one output connector (destination) with the same name are permitted.
- There must always be a valid connector pair, i.e., for each output connector there must be at least one input connector with the same name.
To insert and connect a connector to an object on insertion, select the object output or input and click the 'Insert Connector' button on the editor toolbar:
To insert a connector at a free position in the worksheet, click at the position and then click the 'Insert Connector' toolbar button. Subsequently connect the connector to an input/output.
To edit the connector name, double-click the connector and enter the name or click the 'Edit' in-place button of the connector.