Generating Snapshots of Online Device Parameter Values
This topic contains the following sections:
- General information on snapshots
- 'Online info snapshots' subeditor - Snapshot groups and snapshots
- Creating snapshot groups and adding snapshots
- Operations on snapshots/snapshot groups
- Exporting a snapshot group to an Excel file
General information on snapshots
For diagnosis purposes, so-called snapshots of the device parameter values can be generated at different times. A snapshot contains the actual online parameter values of one or several network devices that the parameters have when the snapshot was created. The snapshot data (the parameters and their values) is shown in the 'Online info snapshots' subeditor of the 'Physical Topology' editor. Capturing snapshots of the device parameter values at different times allow you to view and check the history of the parameter values.
There are two types of information you can read from a network device: SNMP port information and Profinet information. The SNMP port information provides details and statistics on the interface list of the device. The Profinet information provides general data on the device, such as the station name, MAC address, etc. and also the list of slots and subslots with the corresponding data.
| Note
The snapshot groups and snapshots you have created are saved within the PLCnext Engineer project. All information and parameter values shown in the 'Online info snapshots' subeditor are read-only. |
'Online info snapshots' subeditor - Snapshot groups and snapshots
The 'Online info snapshots' subeditor shows the snapshot groups and snapshots captured for the network devices selected in the 'Network Topology' editor. A snapshot group contains a sequence of snapshots created for one or several network devices.
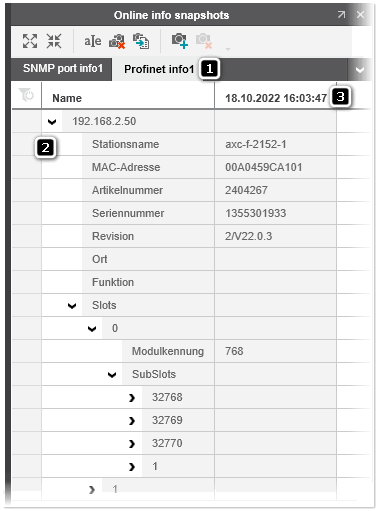
In the 'Online info snapshots' subeditor, each snapshot group is represented by its own tab (see pos. 1 in the following figure). Within the snapshot group, each device which was selected in the topology when creating the group is represented by an own row (the device's IP address is displayed in the first column). If parameters could be read for a device, the parameters and their values are shown in a tree structure under the expandable/collapsible device row (pos 2; first column shows the parameter names and the other columns the values of the parameters of the snapshots captured for the devices).
Once you have created a snapshot group with an initial snapshot, new snapshots for the devices contained in the group can be added to the group via the subeditor's toolbar (see the procedure below). Each snapshot within a group is represented by a table column and identified by the timestamp when the snapshot is created (pos. 3).
Creating snapshot groups and adding snapshots
Proceed as follows:
- If not already performed, scan the network as described in the topic "Scanning the Network and Adding Devices/Connections to the Project".
- If the 'Online info snapshots' subeditor is not visible in the 'Physical Topology' editor, click the
 button on the editor's toolbar.
 - In the topology, select the device(s) for which you want to capture information. (Multi-selection is done in a standard way by Shift-clicking or Ctrl-clicking the elements. To select all elements, press <Ctrl>+<A>.)
- From the context menu of any selected device, choose 'New online info snapshot > SNMP port info' or 'New online info snapshot > Profinet info'. Both commands add a new snapshot group with an initial snapshot (shown in a separate column) to the 'Online info snapshots' subeditor. The snapshot group is added with a default name. (You can rename the label of the group via the
 toolbar button or the group's context menu.)Once you have created a snapshot group with an initial snapshot for specific devices, you can add further snapshots to the group as described in the following step.
 - Optional: add snapshots to a snapshot group.
- In the 'Online info snapshots' subeditor, left-click the tab of the snapshot group to which you want to add a new snapshot.
- In the subeditor's toolbar, click the
 button. A new column with the snapshot data is added to right of the existing columns (the column header shows the timestamp of creation).
Operations on snapshots/snapshot groups
You can perform the following operations on the snapshots/snapshot groups by using the subeditor's toolbar buttons and context menu commands:
| Toolbar button | Context menu command | Description |
|---|---|---|
 | - | Expands/collapses all the rows with child objects. |
| 'Rename selected info snapshots group' | Renames a snaphshot info group (label of the group tab).To rename a group (tab), select the tab you want to rename, and click the button. Alternatively, right-click the tab and select the 'Rename...' command from the tab's context menu. |
 | 'Remove selected info snapshots group' | Removes a snaphshot info group (tab) in the subeditor.To remove a group (tab), select the tab you want to remove, and click the button. Alternatively, right-click the tab and select the 'Remove...' command from the tab's context menu. |
 | - | Exports a selected snapshot info group to an Excel file in csv or xlsx format (see below). |
| - | Adds a snapshot to a snapshot group.To add a snapshot to a group, select the group tab and click the button. A new column with the snapshot data is added to right of the existing columns (the column header shows the timestamp of creation). |
| - | Removes a snapshot (column) from a snapshot group.To remove a snapshot from a group, left-click any cell in the snapshot column you want to remove and click the button (the button is only active, if you have selected a cell in a snapshot column). |
Exporting a snapshot group to an Excel file
Proceed as follows:
- In the 'Online info snapshots' subeditor, select the snapshot group (tab) you want to export.
- Click the button on the subeditor's toolbar.The 'Export online info snapshots' dialog appears.
- In the dialog, click the browse button next to the 'Directory name' field, select the directory in which you want to save the file and choose a file name and file type (*.csv or *.xlsx). Then click the 'Save' button.Depending on the chosen file format, you can configure the following options in the 'Export online info snapshots' dialog:
CSV export options Activate the 'Include column headers' checkbox to export the group data with the column headers as shown in the subeditor. (All other options in the dialog are disabled.) XLSX export options - Activate the 'Include column headers' checkbox to export the group data with the column headers.
- Activate the 'Autofit column width' checkbox to automatically adjust the column widths based on their content.
- In the 'Export' column, activate the checkbox for the snapshots within the snapshot group you want to include in the export file.
- Click 'Export' to export the group data.