Importing External PubSub Configurations from Remote Servers
| Note
To enable OPCUA PubSub server functionality on the PLCnext Technology controller, the "OPCUA PUBSUB service" must be enabled on the WBM page 'System Services' of the controller. |
PLCnext Engineer allows you to browse remote OPC UA servers for importing external OPC UA PubSub configurations. This import mechanism can be used to retrieve the information model from an OPC UA server and add it to the current project without the need to manually create it. This makes it easier to configure the PubSub connections, writer groups, writers, variable mapping, etc. in PLCnext Engineer.
To read out the information model provided by the server, the OPC UA client (PLCnext Engineer in our case) connects to the server via the URL of the started OPC UA server and reads the data from the server.
Notes on importing external configurations
- By default, reader groups/readers contained in a PubSub connection on the server are converted to writer groups/writers in the project and vice versa when importing.
- PLCnext Engineer only supports the "UADP-Periodic-Fixed" layout format. This means that reading and writing is only possible within a reader/writer group, i.e., selecting individual readers, writers or variables during import is not possible.
- The gathered server information is only stored in the project. The data is not required for the PubSub configuration in the project. The data generated by the compiler is not affected and sent to the controller.
How to proceed
- Double-click the 'OPC UA' PLANT tree node and select the 'Server' category in the 'PubSub' editor.
- In the 'Server' table, enter the name of the server to connect to in the 'Name' column (each table row represents a server connection). Configure the following server properties:
Repeat this step for each server you want to add.Property Description URL Endpoint URL of the OPC UA server to connect to (default: opc.tcp://hostname.de:4840). The client uses the URL to find and connect to the OPC UA server. The format is as follows: opc.tcp://IpAddress:Port or opc.tcp://hostname:Port Optionally the port can be specified. If omitted, the default OPC UA discovery port 4840 is used. Note
Currently, only the endpoint type opc.tcp is supported.Security mode Security mode used to connect to the OPC UA server. The security mode defines the level of security for the data being exchanged during client-server communication. You can choose one of the following modes: - 'None' - No security is applied. Data are exchanged unsecure.
- 'Sign' - Data are signed but not encrypted.
- 'Sign and Encrypt' - Data are signed and encrypted.
Security policy url Security policy url used to connect to the OPC UA server. The security policy describes various algorithms and key lengths which are used to establish a secure connection between server and client. In accordance with the OPC UA specification, you can choose one of the following security policies (from top to bottom, the encryption and signature strength increases): - 'None' - No security is applied.
- 'Basic 128 RSA15'
- 'Basic 256'
- 'Basic 256 SHA256'
- 'AES 128 SHA256 RSA OAEP'
- 'AES 256 SHA256 RSA PSS'
- 'Best available' - Best available security policy provided by the OPC UA server is used.
Further Info
See also the 'Security Policies' descriptions in the "OPC UA Security Settings" topic. - Click the first table cell in the server row you want to connect to, then click the
 browse button above the table to start the search.If security has been configured for the selected server, you are prompted for a user name and password. This data is stored (only if requested) in a secure area outside the project. Next time the server is called, the data is retrieved relative to the server's URL. If a server with the same URL is configured in another project, the same user name and password will be provided. To delete the saved data, you must uncheck the 'Remember credentials' checkbox and go online one last time.After successfully connecting to the server, the 'OpcUA Import Configuration' dialog appears. The dialog shows the tree of nodes (connections, groups, readers, writers, and variables) of the PubSub configuration on the OPC UA server.
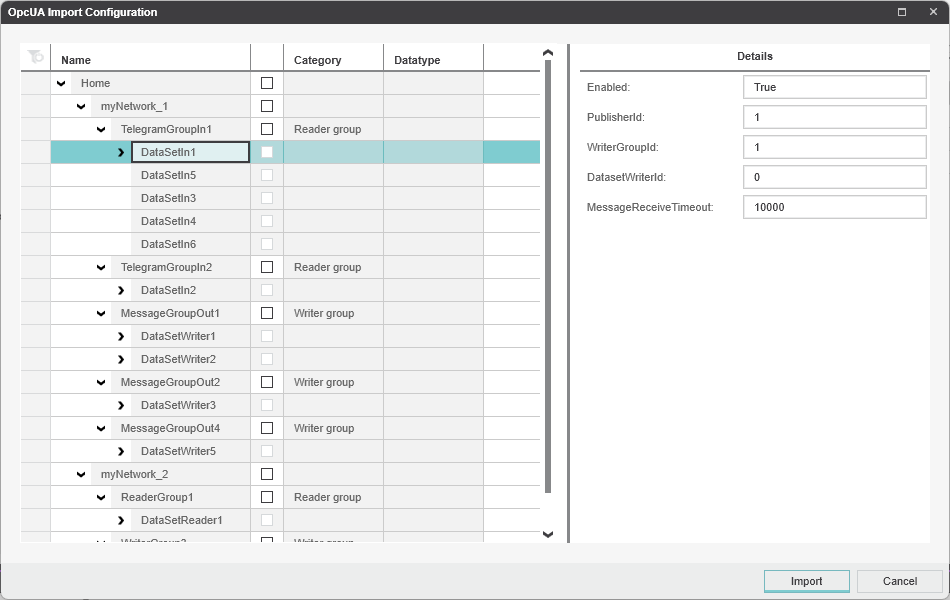 The 'Details' area on the right displays information about the node selected on the left. Unsupported nodes such as readers or writers or, for example, a server variable with an unsupported data type, are marked as faulty (the corresponding tooltip shows the error).
 - In the dialog, select the connections and/or the reader/writer groups to be imported. If you select a connection, all children nodes (reader and writer groups, readers/writers, variables, etc.) are checked and imported. If you select a single reader or writer group, the parent connection node is automatically checked.Only reader and writer groups can be selected. Selecting individual readers, writers, or variables is not possible (see the note at the beginning of the topic).
- Click 'Import' to import the configuration. This adds the following nodes in the 'Configuration' category in the 'PubSub' editor:
- A connection node (and its children nodes) for each connection selected in the import dialog (child node of the root). The connection node is named <ServerName>:<ConnectionName>.
Reader groups/readers on the server are converted to writer groups/writers in the project and vice versa (the group name as defined on the server configuration remains unchanged). - A data set node under the 'Published data sets' node for each data set of a reader group on the OPC UA server (the data set name as defined on the server configuration remains unchanged). The server variables are added to the 'Variables' table of the respective data set node. An imported data set is automatically assigned to the corresponding writer group in the project (created from the corresponding reader group on the server).
- A connection node (and its children nodes) for each connection selected in the import dialog (child node of the root). The connection node is named <ServerName>:<ConnectionName>.
- Map the variables provided by the OPC UA server to variables/ports in the current project.
To connect the variables of an imported published data set:Note
Each server variable that is imported from the PubSub configuration must either be connected to a variable/port in the project or deleted from the current configuration. (PLCnext Engineer reports an error for each server variable which is imported and unconnected.)- Select the desired data set under the 'Configuration > Published data sets' node in the tree structure.
- In the 'Variables' table, select the project variable or port to be connected to the server variable from the 'Local variable' drop-down list. The drop-down list contains all OUT ports and global IEC variables defined in the current project.
To connect the variables associated with an imported reader:Further Info
See also the section "How to add ports/variables to a data set" in the topic "Defining Data Sets to be Published" for further details.- Select the desired reader node under the 'Configuration > Connection > Reader Group' node in the tree structure.
- In the 'Variables' table, select the project variable or port to be connected to the server variable from the 'Local Variable' drop-down list. The drop-down list contains all IN ports and global IEC variables defined in the current project.
Further Info
See also the section "How to add a reader to a group and map target (local) variables" in the topic "Configuring the Controller as a Subscriber" for further details.