POUs
This topic contains the following sections:
POUs (Program Organization Units) in your project are managed in the COMPONENTS area on the right. In the 'Local' folder in the 'Programming' category, you can add, delete, rename and move POUs and open POUs for editing.
According to the IEC 61131-3 standard, the following three POU types Function (FU), Function Block (FB), and Program are available (click the hyperlinks for details):
The program and function block types are to be defined in the COMPONENTS area. The illustration in the topic "Instantiation: Program and FB Instances" explains the relation between types and instances and shows where instances of these types are possible.
 Instantiation of programs and function blocks
Uniqueness and order of precedence (hierarchy) of POUs
Uniqueness of POUs: A user-defined POU must only be defined once within a project. A POU type with the same name is, however, allowed in included libraries. This means when taking libraries into account, multiple types with the same POU name are possible.
Note
To avoid naming collisions between user-defined standard POUs, PLCnext Engineer supports namespaces. Namespaces allow you to organize and group POUs to make them unique within the project. For further details, see the topic "Namespaces". |
Precedence of POUs: If POUs with the same name are defined in the project and provided in libraries, they are subject to a type hierarchy. By including libraries, various hierarchical levels result, especially if libraries contain further included libraries (nested references).
 The following precedence rules apply:
- POUs with the same name are not allowed on the same hierarchical level. In the following example, two libraries containing a POU A are included. This causes the semantic error "A program organization unit with the same name '...' does already exist":Project
Lib1
POU A
POU B
Lib2
POU A
POU C
Note
To avoid naming collisions between user-defined standard POUs, PLCnext Engineer supports namespaces. Namespaces allow you to organize and group POUs to make them unique within the project. For further details, see the topic "Namespaces". |
- A POU replaces (overloads) POUs with the same name on lower hierarchical levels. In the following example, this applies to POU A and POU C:Project
POU A
POU B
Lib1
POU A
POU C
Lib2
POU C
- POUs on lower levels in nested libraries (referenced library inside an included library) cannot be overloaded by the higher level POU and result in an error (POU B in the following example).Project
Lib1
POU A
Lib2
POU B
Lib3
POU B
- In case of multiple instances of the same library on different hierarchical levels (i.e., the library is included directly and as reference in another included library), no error is reported. This is because the same POU is used from the same library (POU B in the following example).Project
Lib1
POU A
Lib2
POU B
Lib2
POU BIn this special case of multiple instances of the same library, a POU with the same name is even allowed on the same hierarchical level, if it has been overloaded before at a higher level.
In the following example, no error is reported although POU B is available twice on the same level. That is because POU B of Lib2 has been replaced before by POU B of Lib1.Project
POU C (uses POU B)
Lib1
POU A (uses POU B)
POU B
Lib2
POU B
Lib2
POU B
When releasing POUs as IEC libraries, the following rules apply:
- If no POU with the same name exists on a lower level, the exported file contains a solution reference to the included library. In the following example, the exported library contains a reference to the Lib1 library.Project
POU A (uses POU B)
Lib1
POU B (visibility = restricted)
- If A POU with the same name exists on a lower level, the exported file does not contain a solution reference to the included library. In the following example, the exported library contains no reference to the Lib1 library.Project
POU A (uses POU B)
POU B
Lib1
POU B (visibility = restricted)
Components of a POU in PLCnext Engineer
Each POU consists of a declaration part (variables table) containing the variable declarations used within the POU and a code part (one or more code worksheets) containing the instructions to be processed.
Double-clicking a POU in the 'Programming' category in the COMPONENTS area opens the editors (see list below) for declaring variables and developing the code.
Note
When editing the code or variables of a safety-related POU (you have to be logged on to the Safety-related Area for that purpose), the editor title bar with hatched background indicates the safety-related context. The consistency of safety-related data is verified continuously by the corresponding editor to detect possible data corruption. |
Details on the editor handling can be found in the help topic "Editors area".
'Settings' editor
 | The 'Settings' editor is used to define:
- namespaces for a standard POU and add namespaces to the 'Usings' list of a POU.See the topic "Namespaces" for details.
- the return data type for function POUs and to specify the access specifier for methods of user-defined function blocks.Object-oriented safety-related function blocks are not supported. This means, no methods can be added to safety-related FBs.See the topic "Methods of FBs in PLCnext Engineer" for details.
|
'Variables' editor
 | The tabular 'Variables' editor is used for declaring the local variables and function block instances of the respective POU. There is only one variables table available for any POU. The 'Variables' editor is shown/hidden in the editors area by clicking the 'Variables' title in the editor group of the POU.
Note
When declaring formal parameter variables for a function or function block POU, the order of the declarations in the variables table determines the order of the appearance of the Fu/FB in the code (at the block symbol or in the ST parameter list). Using the 'Move up/down' icons in the toolbar of the variables table, you can change the order of the block formal parameters in the code.
 / /  |
|
'Code' editor
 | The code editor is used for developing the application code in one of the standard IEC 61131-3 programming languages ST, FBD, LD or SFC. There is one code editor available for each code worksheet contained in the POU. A code worksheet is shown/hidden by clicking the corresponding worksheet title in the editor group of the POU.
Besides the classic free-graphic FBD/LD code, PLCnext Engineer supports another variant of mixed FBD/LD networks referred to as NOLD (network-oriented Ladder Diagram).Safety-related code is programmed in SNOLD (Safety Network Oriented Ladder Diagram) worksheets.
Note
Each POU must contain at least one code worksheet. |
The execution order of the code worksheets within the POU is defined by the arrangement of the code worksheets in the editor group (see below).
Note
Multi-language POUs are supported: code worksheets in different IEC 61131-3 programming languages can be added in one POU. |
Note
Code worksheets of a POU can be excluded from compilation. Worksheets with this flag set will be ignored by the compiler during the build process. See the topic "Excluding Code Worksheets from Build" for details. |
|
'Description' editor
 | The 'Description' editor allows you to enter information on the POU. You can use this editor for documentation purposes, maintaining a version history of the POU and creating online help files for user-defined functions and function blocksSee the topic "Description for Projects, POUs, and Symbols" for details. |
'Safety Information' editor (for safety-related POUs only)
Safety-related POUs additionally provide a 'Safety Information' editor. Here, the checksums are listed which were calculated for each verified network after setting the verification mark. You can use these checksums to find out whether code networks have been modified compared to older project versions. For that purpose, you have to manually compare each checksum with the relating CRC in the printed project documentation of the older, archived project version.
Refer to the topic "Verification Mark for SNOLD Networks" for details.
Management of POUs in the COMPONENTS area
In the 'Programming' category of the COMPONENTS area, Program POUs and Function and Function Block POUs are represented and grouped in separate folders. Right-clicking a node (folder or individual POU) opens a context menu. The context menu contains only commands which can be applied to the selected node. In addition to the standard editing commands such as 'Cut', 'Copy', 'Paste', etc. the context menu provides the commands to add new POUs (see descriptions below).
Structure of POU subcategories
The 'Local' folder in the 'Programming' category contains user-defined programs and functions/function blocks. To organize user-defined POUs, you can add a maximum of 3 subfolders via context menu. The digit behind the folder name indicates the number of contained POUs. POUs can be simply moved via drag & drop between the user-defined folders.
For adding, managing and editing safety-related parts of the project, you have to be logged on to the Safety-related Area which is an area of responsibility restricted to authorized members.
Note
Non-safety-related elements that have been deleted in the COMPONENTS area are added to the RECYCLE BIN (if enabled in the 'Extras > Options' dialog in the 'Tool | Recycle Bin' category). You can restore the deleted non-safety-related elements using the 'Restore' command in the context menu of a deleted element in the RECYCLE BIN. This does not apply to safety-related elements. They are deleted permanently. |
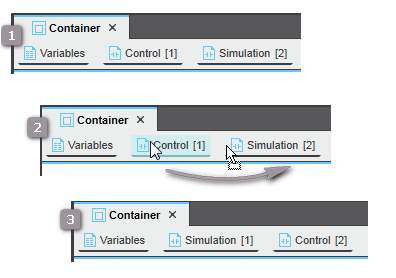
Execution order of code worksheets in a POU
The execution order of the code worksheets in a POU is defined by their arrangement in the editor group. The read-only number in square brackets assigned to the worksheet name (title) indicates the execution order of the worksheet relative to the other worksheets.
To change the execution order of the code worksheets in a POU, drag the desired worksheet and drop it on the worksheet before which it is to be executed (the number in square brackets indicating the execution order is automatically adapted).
Example
Operations on POUs
Add a POU
The steps described below have to be done in the 'Programming' category of the COMPONENTS area in the respective subcategory (under the 'Local' folder):
- 'Programs' if you want to insert a program POU.
- 'Functions & Function Blocks' if you want to insert a function or function block POU.
- Right-click a folder in the respective subcategory and select the desired 'Add POUtype' command from the context menu. (The 'Add' command is only available for folders which allow the insertion of a new POU; for example, new POUs cannot be inserted into the standard functions and function blocks folders.)
The new POU is added under the previously selected folder with a default name which you can modify (see next step).In case of an SFC function block POU, a 'Transition' subfolder with one 'Transition' is automatically created under the new SFC POU.To add a new folder under an existing folder, right-click the folder and select 'Add Folder' from the context menu (a maximum of 3 subfolders can be added).
-
After adding an element in the COMPONENTS area, the name of the new element is in rename mode by default. You can either modify the proposed name or press <Enter> to accept it.
To rename the element later, right-click the icon and select 'Rename' from the context menu or press <F2> and
enter the desired name.
- Double-click the new POU in the COMPONENTS area. In the editors area, click the desired programming language of the first code worksheet in the POU.
The code worksheet and/or the
variables table are displayed in the editors area and you can start editing code and variables.In the 'Settings editor, you can define namespaces for a standard POU and add namespaces to the 'Usings' list of a POU. For a function POU, you have to specify the return data type for the new function in the 'POU Signature' group.
Add a transition or action to an SFC function block POU
- In the folder 'COMPONENTS | Programming > Local > Functions & Function Blocks', right-click the SFC POU.
- Select the desired 'Add ...' command from the context menu.The new transition/action with a default unique name is added under the 'Actions'/'Transitions' folder.
- After adding an element in the COMPONENTS area, the name of the new element is in rename mode by default. You can either modify the proposed name or press <Enter> to accept it.
To rename the element later, right-click the icon and select 'Rename' from the context menu or press <F2> and
enter the desired name.
Safety-related function blocks in SFC are not supported.
Add a method to a user-defined FB POU
- In the folder 'COMPONENTS | Programming > Local > Functions & Function Blocks', right-click the user-defined FB POU.
- Select the 'Add Method' command from the context menu (the command is only available for an FB POU).The new method is added with a default name under the FB POU folder.
- After adding an element in the COMPONENTS area, the name of the new element is in rename mode by default. You can either modify the proposed name or press <Enter> to accept it.
To rename the element later, right-click the icon and select 'Rename' from the context menu or press <F2> and
enter the desired name.
- Double-click the method in the COMPONENTS area. In the editors area, select the desired programming language of the first code worksheet contained in the method. The code worksheet, the variables table and the 'Settings' editor are then displayed in the editors area.
- In the 'Settings' editor, select the 'Access Specifier' for the method and the 'Return Type' from the provided list boxes.
- Edit your program code and create the variables used in the method.
Object-oriented safety-related function blocks are not supported. This means, no methods can be added to safety-related FBs.
Add/delete code worksheets in a POU
Note
In
SFC POUs, only
one code worksheet is allowed. No further code worksheets can be added. |
Note
There is a maximum of 100 worksheets allowed per POU. |
- Open the desired folder under 'COMPONENTS | Programming > Local' and double-click the POU icon where the new worksheet has to be added. The POU group is opened in the editors area.
- In the editors area, click the plus icon on the right in the editor group (in the following example the 'Container' group) and left-click the type of code worksheet to be added.
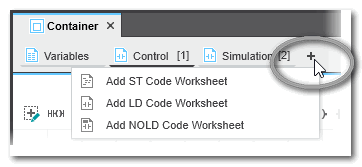
The code worksheet is added after the last code worksheet in the POU (from left to right) with a default name and a number in square brackets. The number indicates the execution order of the worksheet relative to the other worksheets (see section "Execution order" above how to set the execution order of code worksheets).
- If desired, rename the code worksheet by right-clicking the worksheet name and selecting rename from the context
menu (the execution number cannot be renamed but only modified by dragging a worksheet to another position).
To delete a POU code worksheet, right-click the code worksheet title in the editor group and select 'Delete' from the context menu. Each POU must at least contain one code worksheet. Therefore, the last code worksheet cannot be deleted.
Define a namespace for a POU
Import POUs from another project or from a PLCopen XML file
Switch between editors
Switching between editors of an editor group
You can switch between the editors of an editor group (represented as tabs at the upper border of the editors area) via
- KeyboardPress the <Ctrl> key combined with the consecutive number of the editor tab, starting with 1. Example: In the following editor group, the shortcut <Ctrl>+<3> opens the worksheet 'Code1'. Press <Ctrl>+<0> to open the 10th editor.
Note that the number in brackets [...] is the number in the execution order of the code worksheets but not the worksheet number.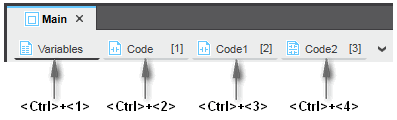
- Drop-down icon at the top right corner
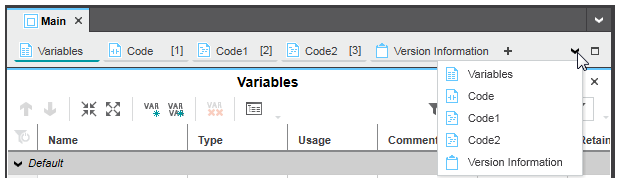 Clicking the drop-down icon at the top right corner in the editors bar opens the list with all editors of the current editor group. Select the desired editor from the list to open and bring the editor into focus.