'Action on Click' Dynamic
The selected action is triggered when the user clicks the object with the mouse (for example, presses and releases a button).

The following actions are available:
| Action | Description | |
|---|---|---|
| Execute command | Executes the selected command as soon as you click the HMI object. Depending on the selected command type, there are different parameters to be configured (see below for a description of the available commands). | |
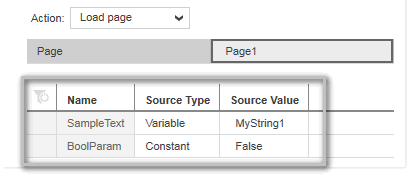
| Load page | Loads (opens) the HMI page selected in the 'Page' drop-down list. The drop-down list provides all HMI pages in the current project. If the selected HMI page provides page parameters, the page parameter table is shown. Here you have to assign valid constants or variables to each page parameter (see the section "Assigning constants and variables to HMI page parameters" in the topic "Defining HMI Page Parameters" for details).
 |
|
| Page back | Goes back to the previous HMI page. | |
| Page forward | Goes forward to the next HMI page. | |
| Navigate right/left/up/down | Navigates to the HMI page that is located right, left, below or above the page in the page structure defined in the 'Navigation' editor. | |
| Navigate home | Navigates to the HMI page that is defined as the startup page in the 'Navigation' editor. | |
| Bring to top | Moves the object selected from the 'Target' list box to the top of the page. The 'Target' list box contains a list of all IDs of the objects that are added to the current page. | |
| Toggle value | Toggles the Boolean variable assigned to the selected HMI tag. | |
| Increment value | Increments the variable value assigned to the selected HMI tag by the value set for the 'Step' (positive or negative value). | |
| Write value | Writes the value set in the 'Source Constant' field to the variable selected in the 'Destination Variable' field. | |
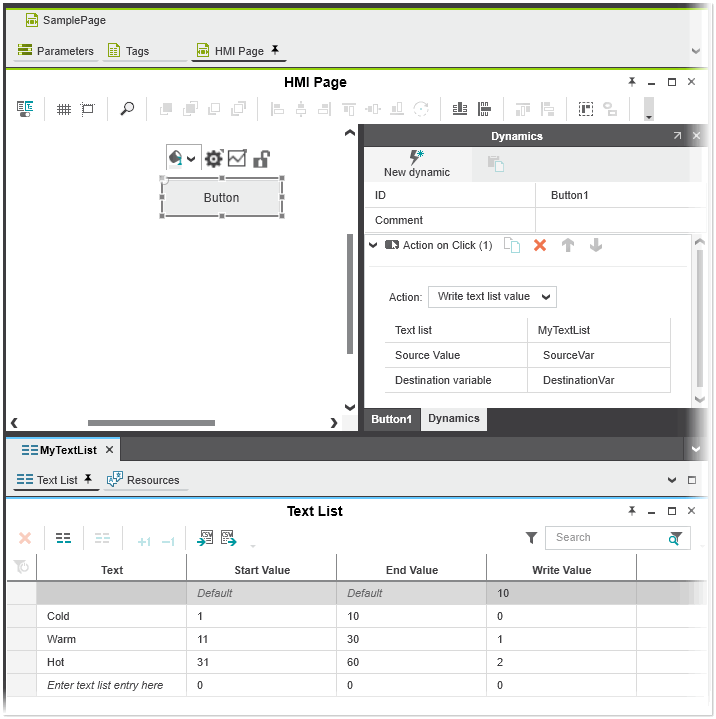
| Write text list value | Writes the 'Write Value' of an entry in the selected text list to the variable selected in the 'Destination Variable' field depending on the value (constant, variable, expression, ...) entered in the 'Source Value' field. The 'Text list' drop-down list contains all text lists configured in your project.
 Example Example
|
|
| Write image list value | Writes the 'Write Value' of an entry in the selected image list to the variable selected in the 'Destination Variable' field depending on the value (constant, variable, expression, ...) entered in the 'Source Value' field. The 'Image list' drop-down list contains all image lists configured in your project (see also the example for the 'Write text list value' action). | |
| Open dialog | Opens a dialog on the selected HMI page. If the selected HMI page provides page parameters, the page parameter table is shown (see the 'Load page' action). Here you have to assign valid constants or variables to each page parameter (see the section "Assigning constants and variables to HMI page parameters" in the topic "Defining HMI Page Parameters" for details).The 'Dim Background' controls dimming of the background when floating dialogs are used. If set to 'True', the background outside the dialog is darkened when it is opened. | |
| Close dialog | Closes a dialog on the selected HMI page. | |
| Log in | Only available if security for HMI is enabled in your project.Loads the user role(s) and the assigned permissions for the user logged in with his account into the current session when running the HMI application. By default, the 'Log In' action is assigned to the 'Log In' button on the 'Login' page template. | |
| Log out | Only available if security for HMI is enabled in your project.Logs out from the current HMI session and then opens the HMI page selected in the 'Page' drop-down list. The drop-down list provides all HMI pages in the current project. If the selected HMI page provides page parameters, the page parameter table is shown. Here you have to assign valid constants or variables to each page parameter (see the section "Assigning constants and variables to HMI page parameters" in the topic "Defining HMI Page Parameters" for details). | |
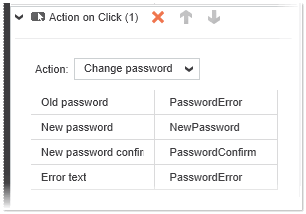
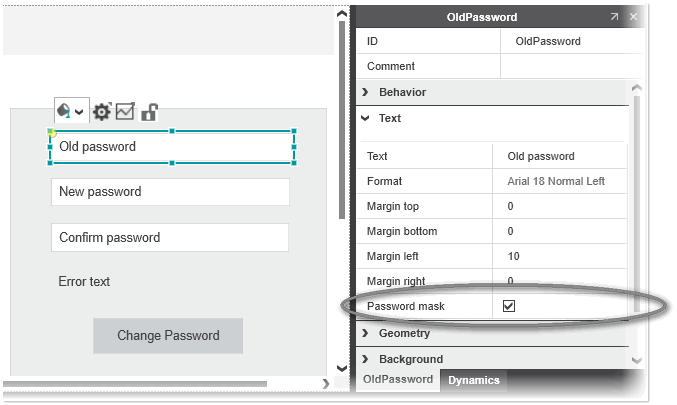
| Change password | Changes the password that is used to restrict the access to the HMI. There are four parameters associated with the action:
Example
|
|
| Acknowledge Alarm | Sets the alarm of the source type value selected in the 'Alarm ID SourceType' field ('Constant' or 'Variable' are available for selection) to the acknowledged state. Acknowledged means the operator is aware of the alarm, i.e., has seen the alarm condition.With 'Constant' as source type value, the value of the string literal is passed to the alarm id. With the source type 'Variable', the selected variable is set to the alarm id of the alarm to be acknowledged. | |
| Confirm Alarm | Sets the alarm of the source type value selected in the 'Alarm ID SourceType' field ('Constant' or 'Variable' are available for selection) to the confirmed state. Confirmed means the operator has solved the problem that caused the alarm. |
Execute commands
The following commands can be selected for the 'Execute command' action:
| Command | Description | |
|---|---|---|
| 'Open support file' | The support file selected in the 'Command Support File' list box is opened in the web browser in a new window (see the following description) or new tab depending on the selection made in the 'Window Behavior' list box.The 'Command Support File' list box provides the support files that you have added to your project as described in the "Adding HMI support files" chapter.
Enabling the web browser to open a new window
To enable the web browser to open a new window for the support file, you have to configure your web browser accordingly:
|
|
| 'Open project' | Opens the HMI project that resides on the HMI server specified with the web address in the 'HMI Project Location' field. Enter the web address in the following format:http://<IP address> or https://<IP address>:<HTTPS port>The HMI project is opened in the web browser in a new window or new tab depending on the selection made in the 'Window Behavior' list box.In the 'Launcher Alias (name)' field enter an alias name if the controller is configured with more than one project. | |
| 'Open URL' | Opens the URL specified in the 'Command URL' field in the web browser in a new window or new tab depending on the selection made in the 'Window Behavior' list box.To navigate outside the HMI application to an URL, enter the URL enclosed by single-quotation marks in the following format: 'http://www.example.com' or 'https://www.example.com' | |
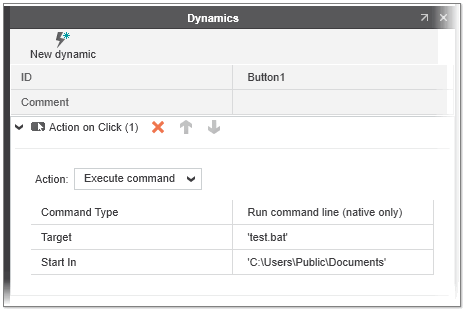
| 'Run command line (native only)' |
Example
|
|
| 'Close application (native only)' |
|