Defining HMI Page Parameters
Each HMI page can have its own page parameters. An HMI page parameter can be used to pass a specific parameter value (constant value or variable value) from another HMI page to the HMI page where the page parameter is defined. This allows you, for example, to pass different values to the HMI page depending which page has written and transferred the page parameter.
To access (write) the HMI page parameters on another HMI page via an HMI object, the parameters can be linked to a page-related 'Action on Click' dynamic ('Load page' or 'Open dialog' action) defined for the object. Each time you bind an HMI page containing page parameters to a 'Load page' or 'Open dialog' action of an object, you have to assign each HMI page parameter a value depending on the type of the parameter. Otherwise, an error is reported in the Error List (MESSAGES window).
This topic contains the following information:
Adding page parameters
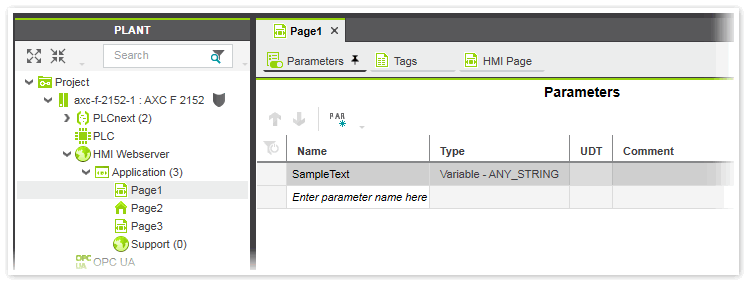
- Open the 'Parameters' editor of the HMI page where you want to add page parameters by double-clicking the HMI page in the PLANT and selecting the 'Parameters' editor in the editors area.
- In the 'Parameters' editor, select the 'Enter parameter name here' cell and type the desired parameter name (max length: 50 characters; blanks are not allowed). Complete the entry by pressing <Enter> or <Tab>. If the entered name is not unique, a red cell frame is shown.
Alternatively, click the
 toolbar button. This adds a new row at the top of the table with a default name.
 - Select the parameter 'Type' from the drop-down list. The 'Type' parameter defines what type of value is accepted for the page parameter when linking it to a 'Load page' or 'Open dialog' action of an HMI object (see the following example). If, for example, the type 'Variable - BOOL' is selected, the page parameter must be bound to an HMI tag with a boolean-based variable assigned.
The following types are available for selection:
Type Description Variable - ANY*
Variable - BOOLThe page parameter must be bound to a project's HMI tag which is connected to a variable of the selected data type or a constant of the selected data type (for example, boolean constant or string constant). With 'Variable - ANY' an HMI tag or a constant with any data type can be assigned to the page parameter. (See also the section below.) Variable - UDT Allows to use a User-Defined Data Type (UDT) as page parameter. The UDT to be linked to the page parameter can be selected from the 'UDT' column. The column provides all UDTs that are available in your project. This includes all UDTs predefined in the system and the UDTs declared in the data type worksheets of your project. Page The page parameter expects an HMI page as source value. Support File The page parameter expects an HMI support file as source value. - If desired, enter a comment into the 'Comment' cell (max length: 250 characters).
 Example
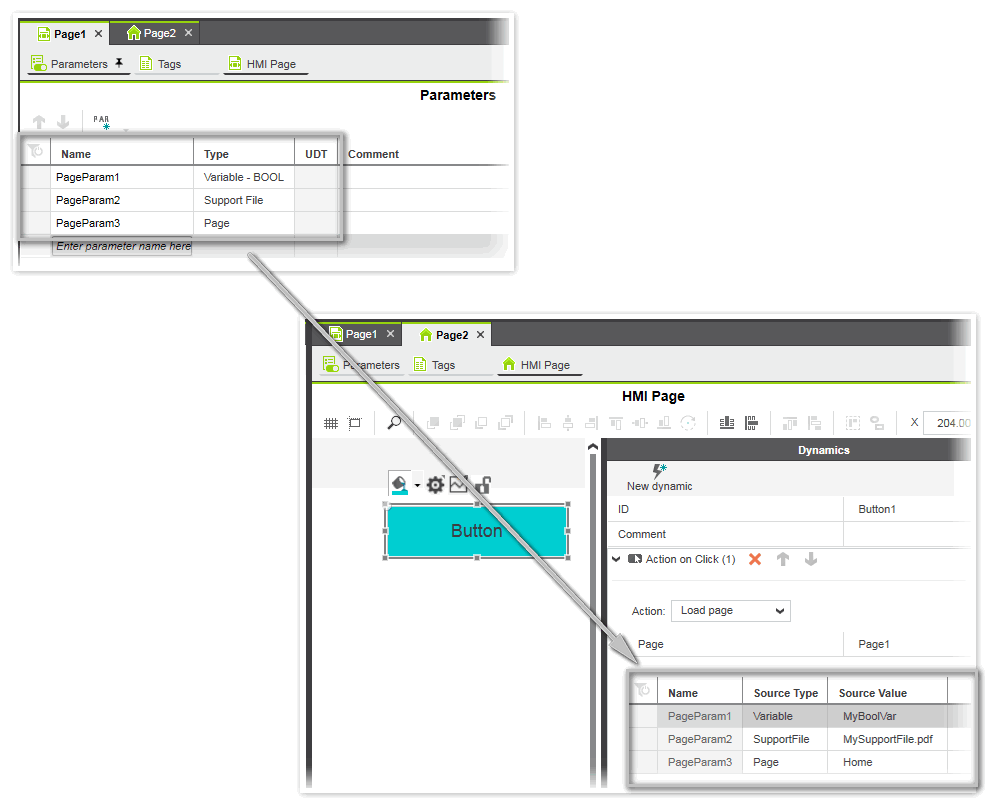
Assigning constants and variables to HMI page parameters
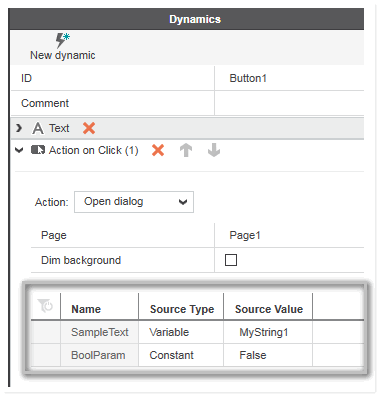
For each object that uses a 'Load page' or 'Open dialog' action with the HMI page containing page parameters as reference, the parameters are listed in tabular form (as shown in the following example). In the parameter table, all parameters must have a valid value (constant or variable) assigned. Otherwise, an error is reported in the Error List (MESSAGES window).
The assignment is done as follows:
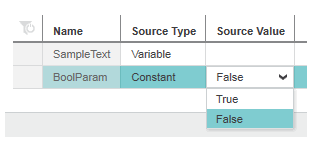
- In the parameters table, click on the 'Source Type' field and select the type of value to be passed (written) to the HMI page parameter when executing the action at runtime.With 'Source Type' set to 'Constant', a constant of the data type expected by the page parameter must be entered as 'Source Value'. For example, if the page parameter is of data type 'Variable - BOOL', only the values 'True' or 'False' are allowed as 'Source Value' and for a page parameter of data type 'Variable - ANY_DATE' only a date constant (e.g. LDATE#2020-01-01) is allowed.With 'Source Type' set to 'Variable', an HMI tag of the data type expected by the page parameter must be entered as 'Source Value'. For example, if the page parameter is of data type 'Variable - ANY_STRING', only an HMI tag with a string-based project variable assigned is allowed as 'Source Value'.
- In the 'Source Value' field, enter the value that is passed (written) to the HMI page parameter.If the 'Source Type' is set to 'Constant', select an entry from the drop-down list (if available, see the following example), or enter the constant value.
 If the 'Source Type' is set to 'Variable', clicking into the field opens the role picker with the project's variables and HMI tags matching the data type of the page parameter (as shown in the following example).
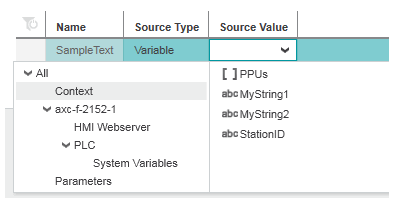
| Further Info
For details how to add a dynamic to an object, see the topic "Adding Dynamics". Details on the 'Action on Click' dynamic can be found here. |
Application example
In this application example, we use two buttons located in two HMI pages (hereafter called "source pages") to write the values of two different HMI tags (bound to variables of data type string) to the HMI page containing the page parameter (hereafter called "target page"). The string value is used to name a checkbox on the target page. Depending from which source page the target page is called via the 'Open dialog' action, the checkbox has a different name.
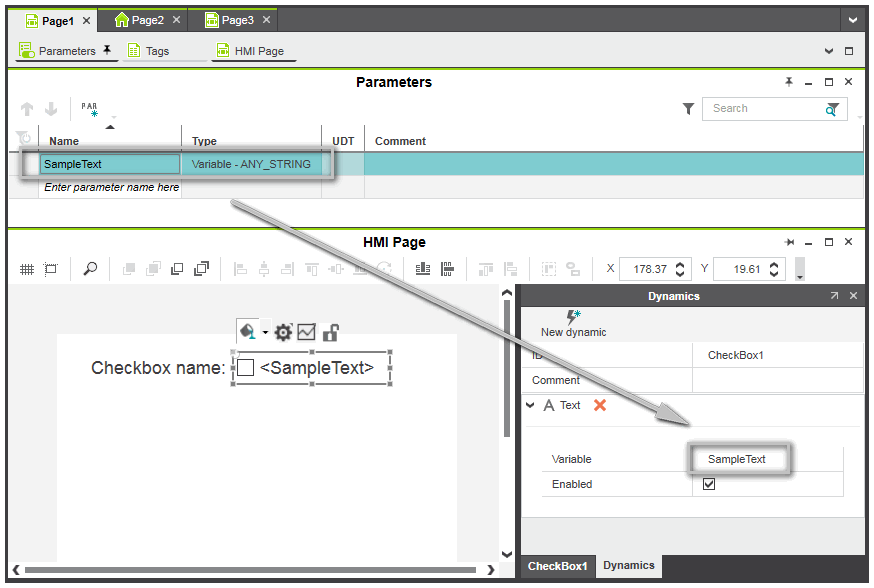
Figure (1): The checkbox on 'Page1' (target page) is named based on the string value that is passed to the page via the 'SampleText' page parameter. The checkbox has a text dynamic with the 'SampleText' page parameter assigned as 'Variable' value.
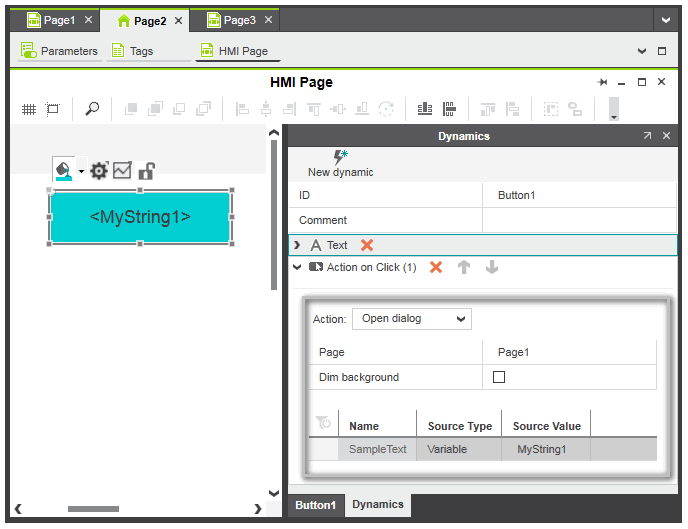
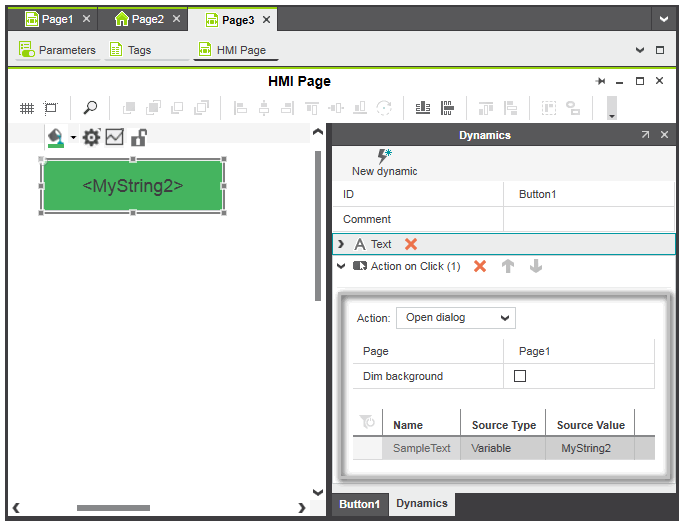
Figures (2), (3): 'Page2' and 'Page3' (source pages) contain a button with an 'Open dialog' action assigned. When the operator presses a button at runtime, 'Page1' is opened and the HMI tag value entered in the 'Source Value' field is written to the 'SampleText' page parameter. This means, the button on 'Page2' passes the content of the 'MyString1' HMI tag to 'Page1' and the button on 'Page3' the content of 'MyString2'.